2 New Apps - See Ratings Across Marketplaces and Prevent Phone Locking when Debugging In Visual Studio

Dec 10, 2010

Did you know that by default you see only ratings for your marketplace? I didn’t, and was very amazed to find out my apps have more reviews and ratings than what shows up in my phone marketplace or Zune window.

Using App Ratings, you can now view the ratings by market on a single screen and access reviews in all markets. Search the marketplace for “App Ratings” or click here to get the app

wp7_152x50_blue

See how fast I can type on that keyboard: Smile

App Ratings uses Atom feed provided by Zune. For more info see the forum posts below:

http://forums.create.msdn.com/forums/p/64382/395208.aspx

http://forums.create.msdn.com/forums/p/66495/406864.aspx

The other app I’d like to mention is called “dev screen saver” and is made by a colleague and friend of mine. It can help prevent your phone from locking – great to use during long hour sessions of debug and deploy in Visual Studio to avoid having to manually unlock your phone. It also moves an image on screen to prevent burnout/burn-in effects and increase screen life.

I hope these apps will be usable to some people. Smile Bye bye Smile


Fantasia Painter Released for Windows Phone 7 + Tips

Dec 5, 2010

Edit Dec 8, 2010: Updated tips (I was too excited the first release and missed some important info in the “how to speed load/save state tip #3)

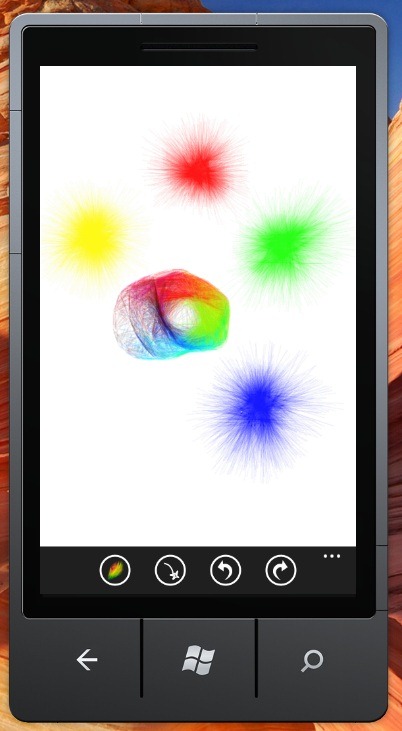
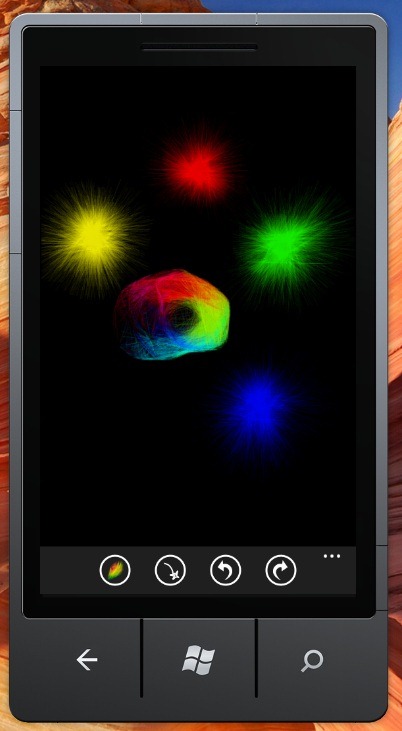
Yes! See the 1-minute intro HD video of the drawing app below. In this version, you can add makeup to someone’s face, change eye color (or other colors). It also comes with all-new fur smudge, and color reveal/hide brushes as well as rainbow mode for all existing Fantasia brushes. Pinch to zoom and move with 2 fingers.

Click here to try or buy Fantasia Painter for your Windows Phone 7

Here is a little longer (2 minutes) video that shows some of the Fantasia Painter’s drawing capabilities in action:

Note: I forgot to mention that you can pinch to Zoom to paint small details (this allows you to draw the small details on the birdie on an actual device, not just the emulator).

Click here to buy Fantasia Painter for your Windows Phone 7 (trial mode supported as well)

Please feel free to send link to this blog to everyone, try, buy, and/or play with the app! I appreciate it!


Technical Details and Tips

The phone version also supports “painting with effect” like the desktop version. For now I have a couple of simple effects that are only exposed through brushes (such as Saturation and Tint). I also added blending modes, which allow for “lighter” and “darker” makeup. The new brushes/effects share the same code (I add reference to the same DLL) as the web Silverlight version of Fantasia and go through the same effect pipeline, which is great! Smile

While developing Fantasia for Windows Phone 7, I noticed collected some useful tips for developers that will hopefully make your life easier. There were some nasty crashes that were hard to find.

Tip 1: Preventing crash/hangup when using TouchPanel and Touch classes

I’m using TouchPanel and Touch for the pinch-to-zoom and move with 2 fingers capabilities. Can you tell what’s wrong with this code:

public partial class MainPage : PhoneApplicationPage
{
    // Constructor

    public MainPage()
    {
        InitializeComponent();

        Touch.FrameReported += Touch_FrameReported;

If you do something like what I did above, you’ll face a very weird issue – when navigating using NavitationService.Navigate() instead of using the back button on the phone, you’ll get a seemingly-random exception for a missing element. What’s going on?

In Windows Phone 7 your page can be created/destroyed whenever it’s not visible (read about Tombstoning). What is interesting though is that if you use NavigationService.Navigate(), your page may be re-created if it was not visible for long time even if your application is still running. The old page should get garbage collected – right? Actually it’s not, since you have the static Touch class referencing a function from your page. Thus, whenever the user taps on the phone, you’ll get a function call in a page that is invalid.

To fix the above issue, override OnNavigatedTo and OnNavigatedFrom and Touch.FrameReported += Touch_FrameReported; and Touch.FrameReported -= Touch_FrameReported; This way your page will get recycled correctly

Tip 2: Use Windows Snippping Tool to get perfect 480x800 screenshots of the Windows Phone 7 emulator.

This really saved me a lot of time. In the Windows start menu search, type “snip” and open the snipping tool. Open the “New” menu and select “Window Snip”. Click on the emulator window (the emulator zoom should be at 100%). You’re done!

Tip 3: Faster state load/save using isolated storage

I noticed an interesting issue: the first time I deployed Fantasia on a real device, loading the state using IsolatedStorageSettings (8 int variables and the picture bitmap), took about 8 seconds! Way too long Smile

Using IsolatedStorageFile to do the same thing takes <0.2 sec on my Samsung Focus.

IsolatedStorageFile storage = IsolatedStorageFile.GetUserStoreForApplication();
IsolatedStorageFileStream file = storage.OpenFile(“myfile.dat”, System.IO.FileMode.Open);
byte[] data = new byte[file.Length];
file.Read(data, 0, data.Length);
file.Close();

Tip 4: WriteableBitmap render speed

WriteableBitmap.Render() was considerably slow on the device compared to PC, to the point where a single stroke would have 0.5 seconds lag for several lines. Thus I had to completely redo the Silverlight line rendering in code, which managed to speed up the whole drawing quite a bit (somewhere between 10 and 100 times). I also improved my brush rendering by avoiding redrawing pixels when they are already drawn and by using optimizations such as drawing one pixel with opacity X*10 instead of 10 pixel with opacity X (another huge speed improvement there.)

Invalidate(): Turns out, the performance here wasn’t too bad. It’s still wise to avoid Invalidate() I could achieve noticeably faster speed by reducing the number of Invalidate() calls per second.

Tip 5: Preventing the panorama and pivots from scrolling

I needed this functionality in order to have the color pickers work as expected and not scroll the view.

This post has sample code: http://blogs.msdn.com/b/luc/archive/2010/11/22/preventing-the-pivot-or-panorama-controls-from-scrolling.aspx

Unfortunately, the above code suffers a similar crashing issue like in Tip 1 above. It’s fairly easy to fix by ensuring the events are unhooked as appropriate. I will likely post the fixed version sometime soon (unless someone else does).

I did 1 month of usability testing (let’s hope it was worth it!) Will publish more info at a later date. There are some very interesting findings such as what is a good color picker, slider, etc.

That’s all for now! Please remember to try out Fantasia Painter, if you’d like it buy it, review, send it to friends, tweet it, facebook it, etc!

I appreciate it! Please send me comments here or in the reviews on the Phone!


Worm Hole and White Hole Space Effects in Silverlight

Nov 7, 2010

A good starry background is so much better with a nice wormhole in it. Do you agree?:

Download source code (note: I added the free purple “star spiral thingie”.png – see steps 5-6 below - used for the above effect to the source code download)

I tried to make a “clean” source code (read: slow, not optimized at all) for the sake of the tutorial and because I didn’t have time to speed it up yet. The code is very good candidate for pre-computations – once optimized it should run fine without any performance issues, including for multiple objects on Windows Phone 7.

Here is a step-by-step explanation of how I made the wormhole demo:

Preparing the images:

  1. Open http://fantasia.nokola.com 
  2. Create a nebula background without stars (from Creations). Edit Tint to make it blue-greenish
  3. Add stars (Creations | Stars)
  4. Go to http://www.spiralgraphics.biz/ and get one of their extremely nice planets. I’m using Arid World, but the rest work amazing too. By the time of this writing, their planets are free for commercial use! (note all license info on site)
  5. Note: you can skip steps 5-6 and just do the effect on top of plain background, it still looks nice. In Fantasia, paint a greenish 100x100 star-shape thingie (the base image for the wormhole) using the Sketch brush
  6. Apply Drain Flush effect (light) to make the star curved a bit, so it looks more like a spiral
  7. Open the starry spiral in GIMP (http://www.gimp.org/) and remove the background (Colors | Color to Alpha)
  8. Open Paint.NET (http://www.getpaint.net/) and combine the background with the planet and the spiral thingie to make the final picture!

Writing the source code:

I spent some time deciding on what I’d like to achieve with the effect. From movies, we all know that galaxies look like spiral and worm holes “suck in” matter from nearby stars.

Thus, I decided that the “drain flush” fantasia effect would look as if matter is “sucked in” to the worm hole. This was my first implementation. Once I saw that I decided to also use the ripple effect, which adds a lot to the “sucking matter in” realism (you can experiment by turning those on or off in the source code. Final wormhole is a combination of ripple + drain flush effects.

The white hole came for free Smile After finishing the wormhole, I noticed that doing a reverse ripple (without drain flush), produces nice radiance that seems to shine outwards, which looks like a white hole (supposedly..if you see one in real life let me know!)

Ok, I did one fundamental performance optimization – since the wormhole is 100x100 and the background is much bigger, it makes sense to create a smaller Image element and put the 100x100 wormhole there. This way you can have a nice wormhole without redrawing the whole background on every frame (significant speed improvement, especially if hardware acceleration is enabled for the background image).

  1. Get the Ripple and Swirl (drain flush) effects from http://wpffx.codeplex.com/
  2. Redo them in C# (SwirlHelper.cs) for 2 reasons:
    1. Windows Phone 7 currently does not support custom pixel shaders
    2. I wanted to have few extra parameters (center and radius) and make the effects apply an alpha*2 linear opacity mask so they blend nicely with the background. I chose alpha *= 2 because I wanted a nice visible center and linear mask fadeoff.
  3. Hook up CompositionTarget.Rendering, load the images, cut out the 100x100 wormhole source image
  4. On every frame, Ripple then Swirl (wormhole) or inverse Ripple (white hole)

Some further ways to improve this, would be to spin the worm hole faster or slower depending on various conditions (e.g. if the wormhole is about to appear, animate the opacity and slowly spin it into existence.)

Hope you like it! Please comment!


Creating Nebulas and Starscapes in Fantasia + Source Code!

Oct 27, 2010

Yes! I just released support for new type of filters in Fantasia that I called Creations. The first, Nebula Creation, allows me do to starry background images like this (source code below):

Update: shortly after releasing the source code I noticed the nebula image was fixed (only the opacity mask was varying), fixed it and uploaded again.

nebula1

Or this:

nebula2

If you’d like to try for yourself, open Fantasia now (http://fantasia.nokola.com) and go to Creations (after Effects).

image

The first one is done by creating a nebula with no stars (set to zero), then Tint, then add stars. The second one is just the Nebula generator Smile I find both very usable for space shooter games Smile

The Creation filters work with the selection brush, and you can easily sprinkle some stars on an image:

Original:

starBefore

Starry night:

starAfter

The starry night version looks much more interesting…just waiting for few comets to pop up! Original image is from here: http://www.flickr.com/photos/dagoaty/4360363431/

I also made a small sample that has just the Nebula generator: http://nokola.com/nebula 

Download source code

I used lots of various sources on perlin noise (like Ken Perlin’s homepage and multiple algorithms for noise), until I got to the current version. It’s optimized to use integer numbers (fixed point calculations) throughout.

A little bit on the algorithm: the important part of the logic is drawing a low-frequency noise (freq = 2) on screen by masking it’s opacity with exponentially filtered high frequency noise (freq = 7). Thus, the low frequency noise becomes a smooth nebula, and the high frequency noise tells “if there’s nebula on screen or not”. In the source code there are a lot of internal parameters to play with.

Hope you like it! Please comment!


Anti-aliased Lines And Optimizing Code for Windows Phone 7–First Look

Oct 14, 2010

Update Oct 27, 2010: Thanks to Shai Rubinshtein (see comments) for pointing out an issue with AALine(), source code updated below and in link.

Some (long) time ago I decided to port Fantasia Painter to Windows Phone 7. When I ran it on an actual device (my friend’s, no I don’t have it yet unfortunately) last week, updating the screen while painting had about 0.5 second lag. This lag is quite unacceptable for a painting app. Here’s how I fixed it.

Turns out, WriteableBitmap.Render() and Invalidate() incur some significant performance cost. I decided to replace the .Render(new Line()) with my own line-drawing function.

I ended up creating my own anti-aliased and alpha blending function, that has similar quality to Render(new Line()) and runs 4.8 times faster. Here’s a proof that it works Smile:

alphaSample1         alphaSample2

Contents of This Post

  • Line Drawing Algorithms
  • Optimizing for Windows Phone 7
  • The Actual Optimizations and Source Code

Line Drawing Algorithms

At first, I decided to use the basic aliased line that I had (now part of http://writeablebitmapex.codeplex.com/.) It turned out pretty ugly – the small spikes on the Furball brush became fat and aliased lines. At least it was running amazingly fast Smile

After a bit of research, I found out Wu’s and Gupta-Sproull’s anti-aliasing algorithms. Wu’s algorithm is fast, but the lines were too thin for my liking, the drawings didn’t look as “natural”.

You can look at a comparison pictures between the various algorithms here: http://igraphicsgroup.com/blog/2009/04/looking_at_different_types_of.html . On the comparison site: AGG (http://www.antigrain.com/demo/index.html) is an open source library that yields the best results in my opinion, but is slower and unfortunately licensed under GPL, which makes it unusable for me since I prefer to license my code under MS-PL which is OK for commercial use.

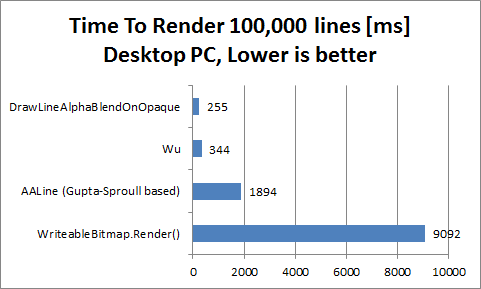
Here’s the speed comparison of the various algorithms, as tested on desktop PC. I have run only some of them on the device as well…will publish more results when I run all of them.

Note that I have not finished optimizing Wu’s line algorithm. Also, DrawLineAlphaBlendOnOpaque is just an aliased line with alpha blending.
image


I decided to optimize the Gupta-Sproull algorithm and see how that works. Here are some sites I looked at:

The algorithm I used is based on http://courses.engr.illinois.edu/ece390/archive/archive-f2000/mp/mp4/anti.html#algo, with some tweaks and fixes.

Optimizing for Windows Phone 7

If you go and look at the first wave of Windows 7 Phone phones here http://windowsphone7.com/ you’ll notice most all of them (at the time of this writing) feature Qualcomm Snapdragon chipset QSD8250 series. From this overview: http://www.pdadb.net/index.php?m=cpu&id=a8250&c=qualcomm_snapdragon_qsd8250, we can see that the processor is 32-bit with ARMv7 instruction set.

It’s a RISC processor with lots of registers. This tells us that we should try putting functions inline vs calling them – e.g. the AlphaBlendNormalOnPremultiplied() function below is a great candidate. We should also try to use int32’s mostly.

Here’s another overview of the Snapdragon chipset: http://www.arm.com/markets/mobile/qualcomm-snapdragon-chipset.php.

The Actual Optimizations and Source Code

You can pick up the current source containing all functions (not well documented since work in progress, except the header of AALine()) mentioned above here: http://nokola.com/sources/DrawingHelper.zip

Note on premultiplied values: I had to take special care when alpha blending with WriteableBitmap pixels, since those are alpha-premultiplied. When using the source, make sure you pass the correct values (premultiplied or not depending on function.).

List of optimizations to the Gupta-Sproull algorithm – code below:

  • Making sure that the distance is within the range 0..1, saving significant amount of multiplies in the alpha blending function AlphaBlendNormalOnPremultiplied()
  • Since the alpha changes often, I changed the alpha blend function to blend “normal” (non-premultiplied) values, instead of converting the values to pre-multiplied format before calling the function (this saves ~6 or so multiplications per pixel)
  • Changed distance to range 0..1023 and moved all floating point calculations outside the drawing loop. The distance computations in the loop are all fixed-point int arithmetic.
  • Multiplied alpha to the “inc” variables before the loop, so we don’t have to multiply it by the distance in the AlphaBlendNormalOnPremultiplied(). Effectively moving the alpha*distance before the loop and replacing the multiplication with additions in the loop.
  • Replacing all multiplications in the loop with additions, by having all distance increments be multiplied just before the loop
  • In the blend function: replacing the high-quality RGB blending with a little bit lower quality (no visible difference whatsoever – maybe pixels are off by one). Note that alpha blending is still using the high-quality computation (value * 0x8081) >> 23 is the same as value / 255. This is optimized to value >> 8 which is the same as value / 256 for RGB.
  • Updated blend function to use uint instead of int (tests on desktop showed 5% faster)
  • Replaced the (g >> 8) << 8 with g & 0xFFFFFF00 in the blending function.
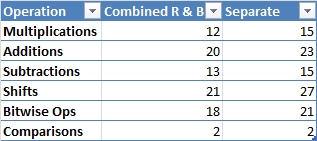
  • Combined the computation of R and B values into one when blending. This saves a lot of computations per pixel!:
    image

Disclaimer: I still have to test this on the phone to ensure I didn’t bug with the compiler optimizations, even though it seems it will yield much better results

Update Oct 18, 2010: Yeah it works great on actual device!

  • Last but not least: unrolling (copy-pasting 3 times) the AlphaBlendNormalOnPremultiplied function in the loop. This is not shown below for simplicity (it is implemented here: http://nokola.com/sources/DrawingHelper.zip). It improves speed by 20%

Potential future optimizations: getting rid of the floating point arithmetic completely (takes 0.2% CPU time now so probably not a big deal); improving speed of alpha blending further (lookup tables?)

/// <summary>
/// Draws an antialiased line, using an optimized version of Gupta-Sproull algorithm
/// </summary>
/// <param name="pixels">Pixels from a WriteableBitmap to draw to (premultiplied alpha format)</param>
/// <param name="pixelWidth">Width of the bitmap</param>
/// <param name="pixelHeight">Height of the bitmap</param>
/// <param name="x0">Start X</param>
/// <param name="y0">Start Y</param>
/// <param name="x1">End X</param>
/// <param name="y1">End Y</param>
/// <param name="sa">Opacity of the line (0..255)</param>
/// <param name="srb">Non-premultiplied red and blue component in the format 0x00rr00bb</param>
/// <param name="sg">Green component (0..255)</param>
public static void AALine(int[] pixels, int pixelWidth, int pixelHeight, int x0, int y0, int x1, int y1, int sa, uint srb, uint sg)
{

    if ((x0 == x1) && (y0 == y1)) return; // edge case causing invDFloat to overflow, found by Shai Rubinshtein

    if (x0 < 1) x0 = 1;
    if (x0 > pixelWidth - 2) x0 = pixelWidth - 2;
    if (y0 < 1) y0 = 1;
    if (y0 > pixelHeight - 2) y0 = pixelHeight - 2;

    if (x1 < 1) x1 = 1;
    if (x1 > pixelWidth - 2) x1 = pixelWidth - 2;
    if (y1 < 1) y1 = 1;
    if (y1 > pixelHeight - 2) y1 = pixelHeight - 2;

    int addr = y0 * pixelWidth + x0;
    int dx = x1 - x0;
    int dy = y1 - y0;

    int du;
    int dv;
    int u;
    int v;
    int uincr;
    int vincr;
   
    // By switching to (u,v), we combine all eight octants
    int adx = dx, ady = dy;
    if (dx < 0) adx = -dx;
    if (dy < 0) ady = -dy;

    if (adx > ady)
    {
        du = adx;
        dv = ady;
        u = x1;
        v = y1;
        uincr = 1;
        vincr = pixelWidth;
        if (dx < 0) uincr = -uincr;
        if (dy < 0) vincr = -vincr;

    }
    else
    {
        du = ady;
        dv = adx;
        u = y1;
        v = x1;
        uincr = pixelWidth;
        vincr = 1;
        if (dy < 0) uincr = -uincr;
        if (dx < 0) vincr = -vincr;
    }

    int uend = u + du;
    int d = (dv << 1) - du;        // Initial value as in Bresenham's
    int incrS = dv << 1;    // Δd for straight increments
    int incrD = (dv - du) << 1;    // Δd for diagonal increments

    double invDFloat = 1.0 / (4.0 * Math.Sqrt(du * du + dv * dv));   // Precomputed inverse denominator
    double invD2duFloat = 0.75 - 2.0 * (du * invDFloat);   // Precomputed constant

    const int PRECISION_SHIFT = 10; // result distance should be from 0 to 1 << PRECISION_SHIFT, mapping to a range of 0..1
    const int PRECISION_MULTIPLIER = 1 << PRECISION_SHIFT;
    int invD = (int)(invDFloat * PRECISION_MULTIPLIER);
    int invD2du = (int)(invD2duFloat * PRECISION_MULTIPLIER * sa);
    int ZeroDot75 = (int)(0.75 * PRECISION_MULTIPLIER * sa);

    int invDMulAlpha = invD * sa;
    int duMulInvD = du * invDMulAlpha; // used to help optimize twovdu * invD
    int dMulInvD = d * invDMulAlpha; // used to help optimize twovdu * invD
    //int twovdu = 0;    // Numerator of distance; starts at 0
    int twovduMulInvD = 0; // since twovdu == 0
    int incrSMulInvD = incrS * invDMulAlpha;
    int incrDMulInvD = incrD * invDMulAlpha;

    do
    {
        AlphaBlendNormalOnPremultiplied(pixels, addr, (ZeroDot75 - twovduMulInvD) >> PRECISION_SHIFT, srb, sg);
        AlphaBlendNormalOnPremultiplied(pixels, addr + vincr, (invD2du + twovduMulInvD) >> PRECISION_SHIFT, srb, sg);
        AlphaBlendNormalOnPremultiplied(pixels, addr - vincr, (invD2du - twovduMulInvD) >> PRECISION_SHIFT, srb, sg);

        if (d < 0)
        {
            // choose straight (u direction)
            twovduMulInvD = dMulInvD + duMulInvD;
            d += incrS;
            dMulInvD += incrSMulInvD;
        }
        else
        {
            // choose diagonal (u+v direction)
            twovduMulInvD = dMulInvD - duMulInvD;
            d += incrD;
            dMulInvD += incrDMulInvD;
            v++;
            addr += vincr;
        }
        u++;
        addr += uincr;
    } while (u < uend);
}

/// <summary>
/// Blends a specific source color on top of a destination premultiplied color
/// </summary>
/// <param name="pixels">Array containing destination color</param>
/// <param name="index">Index of destination pixel</param>
/// <param name="sa">Source alpha (0..255)</param>
/// <param name="srb">Source non-premultiplied red and blue component in the format 0x00rr00bb</param>
/// <param name="sg">Source green component (0..255)</param>
private static void AlphaBlendNormalOnPremultiplied(int[] pixels, int index, int sa, uint srb, uint sg)
{
    uint destPixel = (uint)pixels[index];
    uint da, dg, drb;

    da = (destPixel >> 24);
    dg = ((destPixel >> 8) & 0xff);
    drb = destPixel & 0x00FF00FF;

    // blend with high-quality alpha and lower quality but faster 1-off RGBs
    pixels[index] = (int)(
       ((sa + ((da * (255 - sa) * 0x8081) >> 23)) << 24) | // aplha
       (((sg - dg) * sa + (dg << 8)) & 0xFFFFFF00) | // green
       (((((srb - drb) * sa) >> 8) + drb) & 0x00FF00FF) // red and blue
    );

    //dr = ((destPixel >> 16) & 0xff);
    //db = ((destPixel) & 0xff);

    //uint srb = (uint)((sr << 16) | sb);

   
    //pixels[index] = (int)(
    //   ((sa + ((da * (255 - sa) * 0x8081) >> 23)) << 24) | // alpha
    //   (((((sr - dr) * sa) >> 8) + dr) << 16) | // red
    //   ( ((sg - dg) * sa + (dg << 8)) & 0xFFFFFF00 ) | // green
    //   ( (((sb - db) * sa) >> 8) + db ) ); // blue
}

Hope you like it! Please comment!


We’re Hiring! 19 jobs in WPF/Silverlight Designer in Expression/Visual Studio

Sep 15, 2010

The reason I didn’t post for so long: I was waiting for the public announcement of 19 new job openings in the Expression team!

The jobs include QA (Software Design Engineer in Test), PM (Program Manager) and Dev (Software Design Engineer), Writer and few more. You can apply even if you’re not in the US.

I moved to this team about 2 months ago. I’m currently part of the core/shared graphics team, which is a nice place to be (knock on wood:)) for a person who likes developing samples and working with technologies and devices such as WPF, Silverlight, Windows Phone 7 and web site stuff :)

Expression team includes, amongst other tools Expression Blend, Web, Design. You’ll have opportunity to work at the bleeding edge for both WPF and Silverlight, as well as Expression Web. You may end up working with such software stars like Lutz Roeder (.NET Reflector, anyone?:)

To apply:

  1. Open https://careers.microsoft.com/Search.aspx OR http://www.microsoft-careers.com/go/Expression-Jobs/194506/
  2. For Product select Expression Studio. Click Search, apply for the job that you’d like.
  3. [Optional] Send me your CV (nikolami@microsoft.com) and/or cover letter - I can forward it internally for you. If you end up in this team we’ll likely have to work together at some point of time – I’m very excited about this!

image

Here’s also the list of Expression job openings as RSS feed: https://careers.microsoft.com/Feed/Search.ashx?ss=&jc=all&pr=1041&dv=all&ct=all&rg=all&lang=en

If you have any further questions about the nature of work or the team please let me know.

Hope you like it, please comment.

New Directional Rainbow Brush; Smear Effect; EasyPainter Out of Beta and Becomes Fantasia!

Jul 25, 2010

Yes! A lot of announcements today:

The new Fantasia Painter is here: http://fantasia.nokola.com

  1. New Rainbow brush makes ultra cool smooth color transitions, based on stroke direction
  2. EasyPainter includes all Fantasia brushes and is now named Fantasia!
  3. Fantasia is out of Beta! There is new, enhanced Undo functionality, improved interface.
  4. Smear procedural brush effect makes for reallistic paint “feel” when drawing

Details below:

Rainbow Brush

The rainbow brush changes color based on stroke direction. It cycles through the color wheel.

Here’s a sample:

rainbow

Try making strokes multiple strokes from left-to-right, then from top-to-down, then from right-to-left to see how it feels :)

Fantasia Lite + EasyPainter = Love (= Fantasia Painter)

EasyPainter has all brushes, is out of beta and has an undo stack that is limited to 400 MB and captures undo data every second, if there is a change.

This allows even a mid-stroke undo capturing – a must have for nice experience with the new brushes.

I had this brush improvement in mind probably for the last 5-6 months. It’s nice to finally see it done.

Also, there is a small, but significant UI improvement – some extra margins are removes and a little bit of space is added between some controls. This makes the whole program easier to read. The background behind the image is a little darker too, to “give out the color” some more.

Smear Effect

All of the History procedural brushes (Sketch, Furs, Rainbow), now include “Smear mode”, which looks like this:

smear

Notice how the “Smear on” paint has some darker regions, and generally it looks and behaves like real paint. The “Smear off” paint is smooth, and generally looks more “sketchy”. I believe both painting modes have their use.

The smear is easily controlled from within Fantasia:

image

Technical details: The Smear effect is produced by varying the opacity slightly (e.g. from 243 to 255), and then drawing on black background. It’s not exactly random – I’m using a computation (truncation) “issue” with pre-multiplied alpha. When you draw low-opacity (< 20) object in Silverlight multiple times (e.g. 25 times), the alpha sometimes “magically transfers” making the image with less than 255 opacity. In short, the image can get corrupted due to rounding errors. I’m using this corruption to achieve the Smear effect. In a “perfect world” (where all computations are double and alphas are not premultiplied), you can achieve the same effect by lowering the destination alpha by 2 or so every time you draw a pixel with opacity < 10.

Last but not least: here’s a rabbit made by Burcu with Fantasia. Burcu is one of my new colleagues.


 rabbit

That’s all! Needless to say, I’m happy with Fantasia now.

Hope you like it too! Please comment!

Fantasia Lite: New Silverlight Painting Tool

Jul 22, 2010

Edit: Fantasia Painter (full version), is now available here: http://fantasia.nokola.com

Edit 2: The Fantasia Lite version below, has been updated to include the new Rainbow brush (source code included too).

Here’s what I built tonight – a drawing tool that utilizes procedural brushes to enable almost everyone to create fluffy rabbits like this:

rabbit

Note that it took me about 2 minutes to “build the rabbit”. I’m sure someone else can do better. Supposedly, it lives in the hole on the right.

Here’s the live app:

As usual: Download source code

Note that this whole thing is inspired by http://mrdoob.com/120/Harmony (HTML5 – doesn’t work in IE8 as I write this) which was originally inspired by http://www.zefrank.com/scribbler/gallery/index_ran.html. By the way, make sure to check the funny videos “How To Dance Properly” on Ze’s page: http://www.zefrank.com/invite/swfs/index2.html

I talked way back (March or something) with Mr. Doob and he released his Harmony code under the MIT license. His latest source code is now released under GPL though. I didn’t look at it since I wanted my sources to be MS-PL license-able.

What Is A Procedural Brush?

A typical “brush” will just draw whatever it is supposed to draw (e.g. connect dots with lines). It just needs the current and previous mouse position.

A procedural brush is “smarter”, since it takes more variables into account.

Fantasia’s brushes make use of the following data to modify the drawing output:

  • mouse position
  • velocity (how fast the mouse moved)
  • time between 2 consecutive dots
  • distance between dots
  • slope (angle) of the line between the last and current dot
  • the last N previous dots (N varies between 2 and 100000)

The Fantasia brushes modify these outputs:

  • Color (e.g. color can be changed based on angle which can produce cool output – I haven’t published this brush yet)
  • Opacity (the faster you move, the less visible the trace is, such as in the OldPen sample
  • Stroke width (again can be controlled by speed, or maybe by slope (angle), which produces a nice caligraphy effect)
  • Drawing other random lines

Here is the source code of few of the brushes:

The Line Brush – same as a “regular” brush, just connects dots with straight lines:

public override void Stroke(double x, double y, double dx, double dy, double timeMsec, double distance)
{
    _surface.Render(new Line() { X1 = _prevX, Y1 = _prevY, X2 = x, Y2 = y, Stroke = _brush }, null);
}

The Old Pen brush, uses velocity = distance / time, to modify the color intensity:

public override void Stroke(double x, double y, double dx, double dy, double timeMsec, double distance)
{
    _surface.Render(new Line()
    {
        X1 = _prevX,
        Y1 = _prevY,
        X2 = x,
        Y2 = y,
        Stroke = new SolidColorBrush(
            new Color()
                {
                    A = (byte)(255 - distance / timeMsec * 100),
                    R = (byte) (_color.R * (distance / timeMsec * 100)),
                    G = (byte) (_color.G * (distance / timeMsec * 100)),
                    B = (byte) (_color.B * (distance / timeMsec * 100)),
                })
    }, null);
}

The History brush, most complex so far and used for the sketch and Furs:

public override void Stroke(double x, double y, double dx, double dy, double timeMsec, double distance)
{
    _points.Add(new Point(x, y));
    if ((Memory > 0) && (_points.Count > Memory)) _points.RemoveAt(0);

    _surface.Render(new Line() { X1 = _prevX, Y1 = _prevY, X2 = x, Y2 = y, Stroke = _solidBrush }, null);

    foreach (Point p in _points)
    {
        double cdx = p.X - x;
        double cdy = p.Y - y;

        double dist2 = cdx * cdx + cdy * cdy;

        if ((dist2 < _activationDistance2) && (_random.NextDouble() > (dist2 / (_activationDistance2 * ActivationChance))))
        {
            _surface.Render(new Line() { X1 = x + cdx * ReachSource, Y1 = y + cdy * ReachSource, X2 = p.X - cdx * ReachDest, Y2 = p.Y - cdy * ReachDest, Stroke = _stroke }, null);
        }
    }
}

The history brush can also do internal highlights if the _stroke is set to a LinearGradientBrush.

There is also a prototyping Test brush: I’m trying to “smoothen” the line as it is getting drawn. It’s using binaries by Charlez Petzold: http://www.charlespetzold.com/blog/2009/01/Canonical-Splines-in-WPF-and-Silverlight.html

Hope you like it! Please comment!


Coolest Silverlight Sound Library for Games I’ve Seen Yet

Jun 10, 2010

Quite amazing demo: http://prefix.teddywino.com/post/SilverlightMediaKitLiveDemo.aspx 

The library has a lot of potential for Silverlight games. It does MP3 decoding in managed code and exposes some cool controls like Pitch, Echo. Duet is my favorite. I’m also a Transformers fan and like how Duet makes explosion and swoosh sounds sound “Transformerish”.

I believe it should solve the “short sound” and “looping music” issues with Silverlight without any problem :). The biggest coolness though is that you can now simulate doppler effects and have more “rich” sound in smaller package (for example, by keeping only one explosion.mp3 and varying the pitch slightly).

The CPU usage on my quad core q6600 is ~1-2% of one core for most of the effects. 11% for the Pitch and 8% for the duet.

You can download the source code here: http://salusemediakit.codeplex.com/ (MIT License)

Edit: another library, just released under CDDL License: http://vorbisplayer.codeplex.com/

Playing The Piano From Scratch

May 25, 2010

Yes! For the last month or so I have been studying the piano. Here are my first 2 pieces:

http://www.jamendo.com/en/album/67446

This is the reason why I haven’t done anything public in Silverlight recently. I’ve been also experimenting with the new Expression Blend and Phone 7 stuff.

Note that I started from 0 (zero) :) about 2 months ago, all by myself so coming from “Marry Had a Little Lamb” to the above music was definitely a trip and fun!

They are licensed under CC-BY-SA license. I’ll probably switch it to something even more permissive later.

Contents Of This Rather Long Post

Summary

Key Takeouts For Music – Nokola’s View

Key Takeours For Composers – Nokola’s View

Skills and How Piano is like Role Playing Games

3 Major Cheats For Beginners

Resources And Inspiration


Summary

Here is a summary of my experiences:

  • Piano playing can be very addictive. I started with the goal to play one song (the Meadow from New Moon) and ended up doing a lot of stuff.
  • It’s definitely not hard and it’s better if you like it :)
  • Playing with teacher or following “excercises” is not fun. I always did what I felt like – a lot more fun and I believe helps with development.
  • Composing your own stuff is not as hard as I thought, once you learn some “tricks”. It is a lot like software development :)

I started trying to play The Meadow, but after the first note line, decided to buy a book. Then got a “Learn & Play Keyboard“ – a book for absolute beginners that describes notes, durations, etc. The nice thing about it is that you can start playing immediately with 3 fingers and it builds nicely on top of that.

After finishing this (relatively) small book in about a week, I searched online and found this amazing piano course: http://pianoforall.com/

It’s one of those long sites that offers a lot of stuff with buy buttons and initially I thought it’s “just one of those buy now sites” but after researching I decided to buy the 10 books for ~$40… It was great! The author focuses on “getting the feel of music” from the start, not notation, reading and boring exercises. You begin to improvise almost from the start – great for having fun at your own pace! He will teach you several rhythm patterns then give you “chords” (chords are typically 3 or 4 notes pressed together) for common songs (Beatles, and many many other) so you can experiment. The nice thing is that you can actually understand why a music is composed the way it is, what sounds nice together (to some extent), etc.

After going through books 1-3 I decided to give The Meadow another try! It was much better this time, since I could recognize the patterns and didn’t have to just blindly memorize the notes from the sheet anymore (in fact I play a little different version of The Meadow since I didn’t pay 100% attention to the sheet all the time and probably deviated here and there).

The books contain also a lot of “tricks” “cheats” or “shortcuts” that basically help you “do the job” or “fake it” (produce nicely sounding things with not-so-much effort), which I liked a lot. There is some song that is amazingly simple and sounds (and looks) complex when played.

The key takeouts for music so far (for me):

  • Chords are groups of several notes (e.g. C, E, G) that sound nice together.
  • It doesn’t matter where the notes of the chord are located on the keyboard as long as their name is the same. For example, you can play C at the “bottom” of the keyboard, and E, G at the middle; or you can play the E at the top of the keyboard and G in middle – it’s still the same chord (C, E, G). This is crucial when “mixing” tones as you have much better knowledge of what tones mix “nicely” and what don’t.
  • By modifying a chord a little you can make it sound “mellow” “sad” “happy” or add “tension” (this is the feeling of “something not 100% right” when playing that can later “resolve” to the chord without tension)

The key takeouts for composing music (for me):

  • Composing can start with a very simple (3-4 seconds) melody that can be “enhanced” by using what I call “piano techniques” (not sure what other people call those):
    • Echo: Moving the melody up or down one octave (12 notes)
    • Key Shift: Very powerful technique, as it changes the mood dramatically. I don’t have this in the 2 songs above yet, but I did it last week in the Unbreakable Love and it sounds much improved! “Key shift” is just moving the melody few notes (not an octave) up or down. It works best if your transition between keys does not “jump” notes. For example if you switch from key A to key E, you can play a melody that somehow goes from A to E then shift. Imagine playing a Storyboard and suddenly have your animation jump – who would want that? Ideally, you would make your animations smooth and nice.
    • Time Shift: getting a bit sci-fi here :) Timeshift is just playing the melody gradually faster or slower in order to convey a feeling. It’s used in The Meadow (at least I do) after the second part of the song
    • Pitch Shift: Sometimes, you can add “color” to the music by quickly moving through one or more half-tone notes. For example, you can C, C#, D instead of C,D. It can add a “weird” mood feeling (“something is wrong”) which can make the music more interesting
    • Broken Chords: This just means “play C, then E, then G” instead of all 3 at the time. You can also “break” by playing C, then EG, or some other way. Broken Chords are also called Arpeggios
    • Crawl: If you play with both hands, and slow down one of them significantly (e.g. the right hand), you may end up with a completely new melody that sounds close to the original. One of my last week’s findings (no public music yet) :) Crawling makes music more “dramatic” and “determined” IMO. Or it could do for a sad ending or whatever :)
    • Burst: If you’re in a crawl (or just regular play), you can drastically increase the speed of some of the notes in the melody (it creates a new, similar melody)
    • Repetitions: I had some trouble (and still have) repeating notes – in fact it can help a lot with the music. On few occasions I’d find myself unable to find the “right” note when it was exactly under my finger :)
    • Chord Progressions: probably one of the most defining traits of your music. Progressing between chords means to switch from one chord to another, somehow. The “somehow” leaves a lot of room for interpretation. Given that a chord can be played in many octaves, across octaves, there is a lot of variation. I think a good way to start is by trying to change chords with the minimum number of note changes (e.g. from C, E, G to C, E, A)
    • Duplication: This means playing the same note (e.g. C) on a different octave. You can also do this with chords and play CCEG instead of just CEG.
    • Chord mode on/off: This is when you switch from playing melody to playing chords (happens for 2 times in Unbreakable love). Good when you want to “end a chapter” of the song and continue to the next.
    • Other: there are a lot other I don’t know (e.g. intervals, tremolo fired runs, fills, riffs or whatever else people are doing on youtube)
  • Be free to explore – for example, go one of few notes up and down when playing a melody, many times it sounds a lot more interesting this way
  • Songs usually follow a pattern, for example AXYXYXZ (or other) where X is one melody, Y is “choir” and A,Z are beginning and ending. You don’t have to follow the pattern just for the sake of it, but it sounds nice sometimes.
  • Try to “build up” the melody – for example if it’s “firm and strong” at the beginning, getting more soft towards the end, you probably may want it to get progressively “softer” (as compared to jumping from “strong” to “soft” all the time – unless that’s the point)
  • Try to vary the melody just a little bit – the brain, a very good pattern matching machine feels “engaged” with subtle variety. I read somewhere (don’t remember the source) long time ago that classic compositions usually start with a pattern that rarely (if ever) repeats in its original form until the end, thus keeping the brain engaged “looking for the right pattern”.
    • Make different by not completing – for example, start with half the melody and then add more of it as the song progresses or vice versa (or just skip/add tones as appropriate)
    • Make different by slight changes – changing a note here and there can add enough difference to make the music a whole lot interesting. For comparison with Silverlight, imagine having an animation of a rectangle going back and forth for 10 seconds. Now imagine another animation that builds on top of the first by changing the shape of the rectangle towards circle slightly form time to time. Which one would you be more likely to watch longer?

Skills

Piano playing is like software development (which is like RPG games). Thus, piano playing is like RPG games.

For example, you can use C++, but you may use only it’s “C” part (not the object oriented aspects). Thus learning object-oriented programming is a skill (like in RPG “Fireball Level 3” would be a skill). Piano is the same – you can press the keys but by learning skills you can advance your character level.

Here I will define 3 classes that can be useful to think about when starting with piano:

  • Pianist: master of piano skill and live performances
  • Bard: a great singer (alone or in choir) with good command of an instrument
  • Synthetron: master of computers and synthesizers capable of producing a complete score with many instruments, part by part. May not be necessarily good with live performances though.

There are also 2 life-paths available:

  • Performer
  • Composer

For example, you can be a Pianist Composer or a Bard Performer! :)

Here’s a list of few not-so-obvious skills (at least for me) that can bring you to the next level. Search on the web to find our how to improve those if you’re interested:

  • Relative Pitch: Allows you to name any note in relation to another. For example if someone plays C and tell you it’s C. Then plays E, and you can tell that it’s E, since you can tell how much the second note played was apart from the first. Must-have for the Bard class and overall very good to posess for Pianist and Synthethron too. Choirs tend to “sag” in pitch so having a good relative pitch allows you to sing along.
  • Absolute Pitch: (1) Allows you to name any note when played. (2) Allows you to sing any note (provided you can sing) when named. This is a 2-blade skill, since choirs and pianos go down or “sag” in pitch over time. Then they might sound weird to you. Thus I would apply this skill to Synthetrons or Pianists in possession of electric piano (since these don’t sag in pitch). The big plus is that you can compose music in your head and “hear” music by reading – cool huh? :)
  • Autonomous Hand Control: The name of this implies this skill would be useful for the Synthetron class, although it’s most useful for the Pianist. Having good separate control over both your left and right hand when playing allows you to put your left hand on “auto-pilot” (accompaniment mode) while thinking up a melody with the right hand. Also helps with some of the techniques (such as speeding or slowing down a melody with one hand only).

Obviously, you can expand the list of classes, paths and skills more – I’m interested to hear what people would come by.

Major Cheats for Beginners:

  • Overlaying strings over piano (even cheap keyboards nowadays have this), makes mistakes pop out much less
  • Many other cheats in the http://pianoforall.com/ books (like ballad based on pentatonic scale, where you can hit any note from a huge selection, in any order and it sounds good). These tricks are explained there…
  • I think there’s no need to always try to follow books and tutorials. Take the best of them and move on. For example, I paid very little attention to proper hand posture (after reading that my hands should be “like holding an apple”). My hands were stiff but after 2 weeks they feel lot more smooth and natural without any effort to keep the posture (if you don’t, your fingers start to hurt and the sounds are not so nice so it’s a self-fixing issue:)
  • Youtube is an amazing source of techniques you can use later in composing

Here are a few:


Also some of the master’s works:

This one from ear with lots of improvising based on music from Transformers:

Another interpretation by ear of the same song:

Official Soundtrack to New Moon (The Meadow):

Hope you like it! Please comment!

nokola.com | Terms | Log in

Recent

About the author

Happy & enjoying life. Software enthusiast.
The opinions I express here and on nokola.com are mine and not my employeer's (Microsoft).
This is the official blog of nokola.com. You can find Silverlight samples, coding stuff, and hopefully other interesting things here.