App Rating for Windows Phone 7 Source Code Released

Mar 31, 2011

I’m releasing the App Rating app source code today, under MS-RL license (http://www.opensource.org/licenses/ms-rl). In summary, you can use the App Rating's source for commercial (even directly competitive) projects and are required to provide updates to the source code back to me and the community.

The nice part that you can get from AppRating’s code is the WebApi.cs class, which is optimized for network REST requests, dynamically changing priority of requests, cancelling, etc, and is very lightweight.

Download source code here: http://nokola.com/sources/apprating.zip

I’m still figuring out the correct license for the rest of my sources. Until then they are all under NNCL (http://nokola.com/nncl). btw I’m very open to giving it out to people, per the terms of the license. Already approved few requests.

Hope you like it! Please comment!


New Fantasia Painter, Windows Phone 7 Source Code Pack 1, New License

Mar 25, 2011

I’m back from the fields of Fantasia's [software development]!

This post contains:

  1. New Fantasia Painter available, with 20 effects, an "alive" Fairy Lights brush, Text, symbols and photo functionality
  2. Source code for Fantasia’s high-usability controls tuned for WP7: color pickers, improved slider and easing progress bar.
  3. My new license (NNCL), which promotes fair commercial and personal use while protecting IP and ensures giving back to the community

New Fantasia Painter

The new app has just been released to the marketplace. There’s a free, ad-sponsored version too! People are thrilled by the updates!

Get Fantasia Painter

wp7_152x50_blue 

Get Fantasia Painter Free (Ad Sponsored)

wp7_152x50_blue

Here are the new intro videos and short description of new effects – and I’m just scratching the surface:

Mold tool to change body shape, smiles, enlarge eyes, etc (similar to Liquify in Photoshop), 20 effects, Text, 500+ symbols, speech bubbles.

Higher quality effects and brushes – see “Makeup, Eye color and Eye Shape in 60 seconds” below 

Two and a half minute overview of many effects, new “alive” Fairy Lights brush. Complex (and unique) photo effects that do amazing job, like Color Balance to fix tints due to poor lighting (it’s smarter than the typical balance algorithms), Lifelike Colors.

The power of Fantasia Painter’s effects is that they can all be selectively applied to part of an image. Fantasia also combines effect by usage: for example, instead of having 3 separate effects for Brightness/Contrast, Saturation and Exposure, you have one – this can save you a lot of time when editing pictures.

The 4 image enhancements (Color balance, Lifelike Colors, Bright/Contr/Sat/Expo, White Point/Rebalance) effects are roughly equivalent to 7 or 8 effects from other photo editing tools, plus multiple Photoshop enhancement steps (in the case of Lifelike Colors).

Here are some things I’ve done with Fantasia on an actual device in the last day or so:

Painted from scratch in < 2 minutes, starting with Rainbow background and using Makeup brushes and Recolor effect:
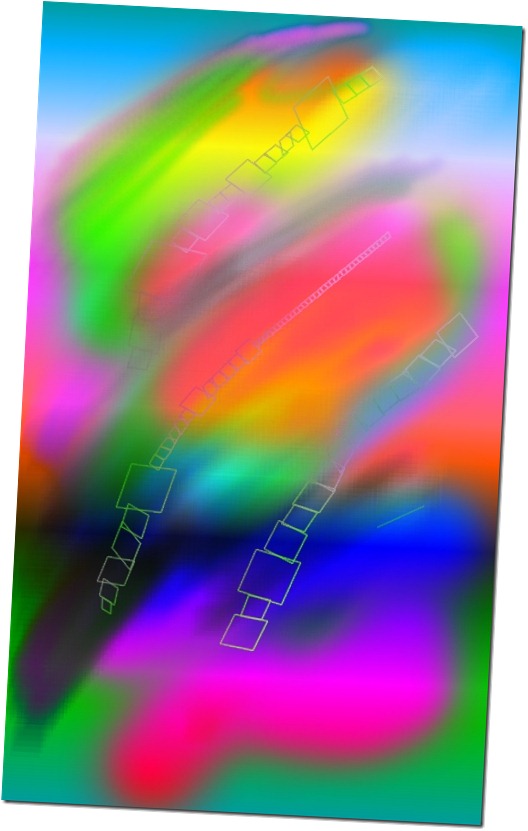
cool

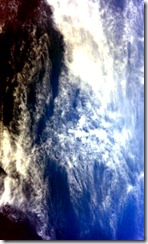
Auto Color balance reveals hidden parts of this sky picture!

Original (left), Auto Balance (Right)
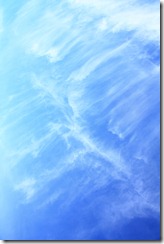
1331500_41770898auto balance


Gentle Painter effect:

gentle (2)

Source Code – Windows Phone Controls Pack 1

The source code is licensed under NNCL (see below). It means that you must get permission from me in order to use it in any project (commercial, even when released for free).

I will likely allow it, but will require you to contribute code (or article, or something else) to either me or the community in return. In case you’re direct competitor, I will most likely flat out refuse, or ask you to either trade me some of your source code or release it publicly.

I spent 2 months doing usability testing of the controls, and they are highly usable for all my tested age groups (4 to 70), by people with different levels of computer knowledge and different finger width. They are also very UI-friendly (just put them in StackPanel with Margin 0 and you’re good), lightweight, and fast.

Download Nokola Windows Phone Source Pack 1

The pack includes:
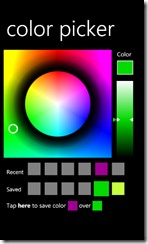
imageimageimageimage

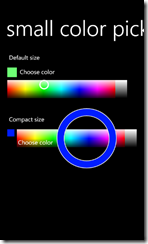
What’s so good about the color pickers above? It’s the fact that most colors can be selected with single finger. This is a significant usability improvement. I found out that the “typical” color picker (like the one on http://fantasia.nokola.com) is very hard for phone users to choose color from. Especially for non-developers. In most cases, they would drag their finger on the hue selector on the right, and wonder “why didn’t the color change?” (it didn’t, because the left rect was set to white, for example). The color picker above resolves the issue since a combination of hue/saturation/value is presented in 2D, while the side rectangle allows to further customize color to be able to choose from the full color range. This allows for single-finger selection from most used colors.

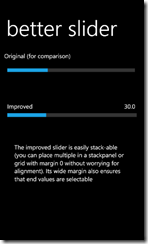
The “better slider”, has the following features:

  • significantly easier to choose value (try it on an actual device)
  • larger hit test area
  • shows slider value
  • carefully engineered so you can easily select minimum and maximum value too

It also has a drawback – it is not very usable with scrolling UI. But for non-scrolling UI it’s the bomb Smile

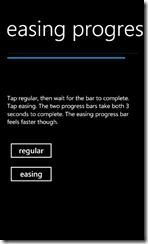
Easing progress bar: after much experimentation, I found out that when a particular easing function is applied to a progress bar, it appears that the progress takes less time. Try the two progress bars in the demo one after the other and see for yourself Smile

Nokola-NCL (Nokola Non-Competitive License or NNCL)

Last but not least all of my source code is now licensed under NNCL (http://nokola.com/nncl), which stands for “Nokola Non-Competitive License.” (I expect other people to come up with similar <your name>-NCL licenses btw).

I was wondering: how do I share my source code, and allow non-competitive programs to use it, while protecting myself from competitors? How do I make sure that when the code I release is improved, others can benefit from it too (including commercial use)?

The MS-PL license does not protect me from competitors, and it also does not ensure that improvements are returned back to the community. For example, one could pick up my Silverlight slider control, which used to be licensed under MS-PL, redo it for Windows Phone 7, and use it privately.

The GPL does not allow commercial use with competitor protection.

The reason while I was “in the dark” for few months, not releasing any code was due to the above dilemmas.

Thus the need of NNCL Smile

NNCL License Summary
The NNCL License has the following goals:

  • improve source code sharing and availability to community. Many people, including MVPs just don’t release any of their source code in fear that it might be (and in fact, it will be) used by direct competitors. In mind mind, the choices are: 1. release the source under MS-PL, which means anyone can use and (morally) abuse it. 2. don’t release it at all (which is what a lot of people do today – just check how much high-quality and novel Silverlight vs Windows Phone 7 code articles are being released) 3. Release it under commercial, but reciprocal license line NNCL.
  • ensure direct and indirect competitors only use code and assets if they provide something back to the software community of the original code author

You have to contact me (Nokola: nikola.mihaylov@gmail.com) for permission before using source or images on Windows Phone 7 or other mobile device.
I am very likely to allow you to use it, with certain requirements, depending on the situation. For example, I might ask you to release specific source publicly to the community.
Sometimes I might just flat out refuse (if you're a direct competitor), unless you have something to offer me or the community in return.

Any changes you make to improve the controls, must be made available to me (and likely to the community) for commercial use, licensed under NNCL.
All derivative works have to be licensed under NNCL as well. You can include a <your name here>-NCL license if you create derivative works too.

Read the full license text here: http://nokola.com/nncl

And I hope the NNCL is fair – what do you think?

Hope you like the updates! Please comment!

Remember to search for Fantasia Painter on the marketplace, get it, use it, tweet it, rate it, and comment here if you see issues.


Worm Hole and White Hole Space Effects in Silverlight

Nov 7, 2010

A good starry background is so much better with a nice wormhole in it. Do you agree?:

Download source code (note: I added the free purple “star spiral thingie”.png – see steps 5-6 below - used for the above effect to the source code download)

I tried to make a “clean” source code (read: slow, not optimized at all) for the sake of the tutorial and because I didn’t have time to speed it up yet. The code is very good candidate for pre-computations – once optimized it should run fine without any performance issues, including for multiple objects on Windows Phone 7.

Here is a step-by-step explanation of how I made the wormhole demo:

Preparing the images:

  1. Open http://fantasia.nokola.com 
  2. Create a nebula background without stars (from Creations). Edit Tint to make it blue-greenish
  3. Add stars (Creations | Stars)
  4. Go to http://www.spiralgraphics.biz/ and get one of their extremely nice planets. I’m using Arid World, but the rest work amazing too. By the time of this writing, their planets are free for commercial use! (note all license info on site)
  5. Note: you can skip steps 5-6 and just do the effect on top of plain background, it still looks nice. In Fantasia, paint a greenish 100x100 star-shape thingie (the base image for the wormhole) using the Sketch brush
  6. Apply Drain Flush effect (light) to make the star curved a bit, so it looks more like a spiral
  7. Open the starry spiral in GIMP (http://www.gimp.org/) and remove the background (Colors | Color to Alpha)
  8. Open Paint.NET (http://www.getpaint.net/) and combine the background with the planet and the spiral thingie to make the final picture!

Writing the source code:

I spent some time deciding on what I’d like to achieve with the effect. From movies, we all know that galaxies look like spiral and worm holes “suck in” matter from nearby stars.

Thus, I decided that the “drain flush” fantasia effect would look as if matter is “sucked in” to the worm hole. This was my first implementation. Once I saw that I decided to also use the ripple effect, which adds a lot to the “sucking matter in” realism (you can experiment by turning those on or off in the source code. Final wormhole is a combination of ripple + drain flush effects.

The white hole came for free Smile After finishing the wormhole, I noticed that doing a reverse ripple (without drain flush), produces nice radiance that seems to shine outwards, which looks like a white hole (supposedly..if you see one in real life let me know!)

Ok, I did one fundamental performance optimization – since the wormhole is 100x100 and the background is much bigger, it makes sense to create a smaller Image element and put the 100x100 wormhole there. This way you can have a nice wormhole without redrawing the whole background on every frame (significant speed improvement, especially if hardware acceleration is enabled for the background image).

  1. Get the Ripple and Swirl (drain flush) effects from http://wpffx.codeplex.com/
  2. Redo them in C# (SwirlHelper.cs) for 2 reasons:
    1. Windows Phone 7 currently does not support custom pixel shaders
    2. I wanted to have few extra parameters (center and radius) and make the effects apply an alpha*2 linear opacity mask so they blend nicely with the background. I chose alpha *= 2 because I wanted a nice visible center and linear mask fadeoff.
  3. Hook up CompositionTarget.Rendering, load the images, cut out the 100x100 wormhole source image
  4. On every frame, Ripple then Swirl (wormhole) or inverse Ripple (white hole)

Some further ways to improve this, would be to spin the worm hole faster or slower depending on various conditions (e.g. if the wormhole is about to appear, animate the opacity and slowly spin it into existence.)

Hope you like it! Please comment!


Creating Nebulas and Starscapes in Fantasia + Source Code!

Oct 27, 2010

Yes! I just released support for new type of filters in Fantasia that I called Creations. The first, Nebula Creation, allows me do to starry background images like this (source code below):

Update: shortly after releasing the source code I noticed the nebula image was fixed (only the opacity mask was varying), fixed it and uploaded again.

nebula1

Or this:

nebula2

If you’d like to try for yourself, open Fantasia now (http://fantasia.nokola.com) and go to Creations (after Effects).

image

The first one is done by creating a nebula with no stars (set to zero), then Tint, then add stars. The second one is just the Nebula generator Smile I find both very usable for space shooter games Smile

The Creation filters work with the selection brush, and you can easily sprinkle some stars on an image:

Original:

starBefore

Starry night:

starAfter

The starry night version looks much more interesting…just waiting for few comets to pop up! Original image is from here: http://www.flickr.com/photos/dagoaty/4360363431/

I also made a small sample that has just the Nebula generator: http://nokola.com/nebula 

Download source code

I used lots of various sources on perlin noise (like Ken Perlin’s homepage and multiple algorithms for noise), until I got to the current version. It’s optimized to use integer numbers (fixed point calculations) throughout.

A little bit on the algorithm: the important part of the logic is drawing a low-frequency noise (freq = 2) on screen by masking it’s opacity with exponentially filtered high frequency noise (freq = 7). Thus, the low frequency noise becomes a smooth nebula, and the high frequency noise tells “if there’s nebula on screen or not”. In the source code there are a lot of internal parameters to play with.

Hope you like it! Please comment!


Fantasia Lite: New Silverlight Painting Tool

Jul 22, 2010

Edit: Fantasia Painter (full version), is now available here: http://fantasia.nokola.com

Edit 2: The Fantasia Lite version below, has been updated to include the new Rainbow brush (source code included too).

Here’s what I built tonight – a drawing tool that utilizes procedural brushes to enable almost everyone to create fluffy rabbits like this:

rabbit

Note that it took me about 2 minutes to “build the rabbit”. I’m sure someone else can do better. Supposedly, it lives in the hole on the right.

Here’s the live app:

As usual: Download source code

Note that this whole thing is inspired by http://mrdoob.com/120/Harmony (HTML5 – doesn’t work in IE8 as I write this) which was originally inspired by http://www.zefrank.com/scribbler/gallery/index_ran.html. By the way, make sure to check the funny videos “How To Dance Properly” on Ze’s page: http://www.zefrank.com/invite/swfs/index2.html

I talked way back (March or something) with Mr. Doob and he released his Harmony code under the MIT license. His latest source code is now released under GPL though. I didn’t look at it since I wanted my sources to be MS-PL license-able.

What Is A Procedural Brush?

A typical “brush” will just draw whatever it is supposed to draw (e.g. connect dots with lines). It just needs the current and previous mouse position.

A procedural brush is “smarter”, since it takes more variables into account.

Fantasia’s brushes make use of the following data to modify the drawing output:

  • mouse position
  • velocity (how fast the mouse moved)
  • time between 2 consecutive dots
  • distance between dots
  • slope (angle) of the line between the last and current dot
  • the last N previous dots (N varies between 2 and 100000)

The Fantasia brushes modify these outputs:

  • Color (e.g. color can be changed based on angle which can produce cool output – I haven’t published this brush yet)
  • Opacity (the faster you move, the less visible the trace is, such as in the OldPen sample
  • Stroke width (again can be controlled by speed, or maybe by slope (angle), which produces a nice caligraphy effect)
  • Drawing other random lines

Here is the source code of few of the brushes:

The Line Brush – same as a “regular” brush, just connects dots with straight lines:

public override void Stroke(double x, double y, double dx, double dy, double timeMsec, double distance)
{
    _surface.Render(new Line() { X1 = _prevX, Y1 = _prevY, X2 = x, Y2 = y, Stroke = _brush }, null);
}

The Old Pen brush, uses velocity = distance / time, to modify the color intensity:

public override void Stroke(double x, double y, double dx, double dy, double timeMsec, double distance)
{
    _surface.Render(new Line()
    {
        X1 = _prevX,
        Y1 = _prevY,
        X2 = x,
        Y2 = y,
        Stroke = new SolidColorBrush(
            new Color()
                {
                    A = (byte)(255 - distance / timeMsec * 100),
                    R = (byte) (_color.R * (distance / timeMsec * 100)),
                    G = (byte) (_color.G * (distance / timeMsec * 100)),
                    B = (byte) (_color.B * (distance / timeMsec * 100)),
                })
    }, null);
}

The History brush, most complex so far and used for the sketch and Furs:

public override void Stroke(double x, double y, double dx, double dy, double timeMsec, double distance)
{
    _points.Add(new Point(x, y));
    if ((Memory > 0) && (_points.Count > Memory)) _points.RemoveAt(0);

    _surface.Render(new Line() { X1 = _prevX, Y1 = _prevY, X2 = x, Y2 = y, Stroke = _solidBrush }, null);

    foreach (Point p in _points)
    {
        double cdx = p.X - x;
        double cdy = p.Y - y;

        double dist2 = cdx * cdx + cdy * cdy;

        if ((dist2 < _activationDistance2) && (_random.NextDouble() > (dist2 / (_activationDistance2 * ActivationChance))))
        {
            _surface.Render(new Line() { X1 = x + cdx * ReachSource, Y1 = y + cdy * ReachSource, X2 = p.X - cdx * ReachDest, Y2 = p.Y - cdy * ReachDest, Stroke = _stroke }, null);
        }
    }
}

The history brush can also do internal highlights if the _stroke is set to a LinearGradientBrush.

There is also a prototyping Test brush: I’m trying to “smoothen” the line as it is getting drawn. It’s using binaries by Charlez Petzold: http://www.charlespetzold.com/blog/2009/01/Canonical-Splines-in-WPF-and-Silverlight.html

Hope you like it! Please comment!


EasyPainter Source Pack 3: Adorners, Mouse Cursors and Frames

Mar 17, 2010

Adorners went a long way since their first release few months ago.

They integrate with zoom now, have more options for controlling functionality and can use a shared "cursor plane" for displaying mouse cursors consistently across your application. Extensibility is improved allowing definition of custom adorner frames. There are 7 custom cursors and 4 custom frames to get you started :)

Download source code

I use the same adorner implementation in EasyPainter.

Here's a live demo with different adorner frame for each image:

Features

  • Custom, Extensible Mouse Cursors allow you to use the system or your own mouse cursors even if you don't use the adorner functionality. See CursorPlane.cs for more info

The custom cursors support:

    • Size (for example, bigger cursor for bigger brush size)
    • Rotation (used to make the resize cursor perpendicular to the adorner frame)

The current list supports all system cursors as well as these:

Size, // Size cursor that supports angle
Rotate, // Rotate cursor supporting angle
Move, // Move cursor
Brush, // Brush cursor, supports size
SelectionBrush, // Selection brush cursor
Crosshair, // Crosshair cursor - like the one used on snipers or in image editing programs to pinpoint that pixel
MarkerSelect, // Cursor used to select a marker on the surface (e.g. used to select point for applying origin for zoom blur effect)

To use the cursors you have to set up a cursor plane in XAML:

<adorners:CursorPlane Name='cursorPlane' />

And then initialize it in code-behind:

    InitializeComponent();
    ctlCursorPlane.SetSystemCursorElement(frameRoot);

The frameRoot specifies which control will display the cursors. For example, in EasyPainter the Crop adorner spans only the image (the adorner is parented to a different parent than the cursor plane), but the rotate/resize cursor go outside of the image. The frameRoot is used to calculate the offsets so that the adorners (or someone else using the cursor plane) can account for the different parents and draw the cursors at the correct locations on screen.

  • Customizable Adorners with extensible adorner frames

You can now define your custom adorner frames by creating a UserControl and implementing the functionality you need from the IAdornerFrame interface.

There are 4 existing frames currently: AnimatedRectangleFrame, CropFrame, GlassFrame and PointFrame. The last one is just a dot being used to specify locations of effects in EasyPainter – e.g. Zoom motion effect.

The existing frames can be zoom-aware. For example the CropFrame displays the correct image width and height in the top-left corner regardless of zoom.

/// Represents an adorner frame, e.g. glass border
public interface IAdornerFrame {
    /// Called when the frame is attached to adorner
    void Attached();

    /// Called when the frame is detached from adorner
    void Detached();

    /// Sets the zoom level for this adorner frame. The zoom level is used by the frame to display correct coordinates (e.g. Width and Height)
    void SetZoom(double newZoomLevel);

    void SizeChanged(double newWidth, double newHeight);
}

  • More adorner options: bool CanRotate, CanResize, CanMove, void SetBounds(x, y, width, height), SetZoom(double zoomLevel) allow you to change adorner capabilities, restrict it to specific area, and make it zoom-aware

I didn't have time to add the behaviours back since I don't use those yet and I'm mainly using Visual Studio for development. If anyone is interested in porting these over to the current version Andrej Tozon created the Behaviours for the original version. Here's a link to his version. Thanks Andrej!

The source code is licensed under MS-PL.

Pictures are licensed under the following Creative Commons License: http://creativecommons.org/licenses/by/2.0/
Picture locations:
http://www.flickr.com/photos/proimos/3954987905/
http://www.flickr.com/photos/proimos/4300827122/
http://www.flickr.com/photos/tenioman/2771903123/

Hope you like it! Please comment!


EasyPainter Source Pack 2: Flickr, ComboCheckBox and more!

Mar 11, 2010

Yes! EasyPainter Source Pack 2 is here!

This source pack contains Flickr integration sample amongst other also important things (read below).

Download Source Code

The live demo:

Usage

  1. Go to http://www.flickr.com/services/api/, sign up and get an API key for your app
  2. Put the key in Flickr\FlickrHelper.cs
  3. Use the below code behind and XAML:

public MainPage() {
    InitializeComponent();
    Globals.ToolbarRadioButtonStyle = (Style)Application.Current.Resources["ToolbarRadioButton"];
    IGenericUserInterface ui = (IGenericUserInterface)openDialog1;
    ui.Result += new GenericResultHandler(ui_Result);
}

void ui_Result(IGenericUserInterface sender, EasyPainter.Imaging.ResultType result, bool uiDismissed) {
    MessageBox.Show(String.Format("Result type: {0}\nPhoto Url: {1}", result, openDialog1.PhotoUrl));
}

XAML:

<Grid x:Name="LayoutRoot" Background="White">
    <my:OpenDialog x:Name='openDialog1' />
</Grid>

License

The source code of the sample is licensed under MS-PL

Flickr usage is governed by their own license: check the terms of use on http://www.flickr.com/services/api/ for more details.

Source Code Information

Apart from Flickr, there are some other things interesting to developers in this sample:

  • Queuing for WebClient. The WebClient class does not allow to call DownloadStringAsync() while another download using WebClient is in progress. The WebClientQueue class in the sample allows you to queue work items, cancel them, gracefully display and recover from errors and get updates on progress.
  • Caching for WebClient REST API and other requests. The current cache is set in WebClientQeueue to 5 minutes. Huge speed improvement when browsing through the images!
  • ComboCheckBox control (far from perfect, but still usable for some cases)
  • Minimalistic WrapPanel. The 10KB version of the WrapPanel extracted from the Silverlight toolkit that is typically around 280 KB.
  • Lightweight XML parsing. Using XMLReader instead of Linq like other samples do helps shave off about 100KB of size from the sample
  • Small size! Combining the 2 above items, and the XAP file is only 27K (I wish it was less but life if life :))
  • ImageList control for showing and paging through images
  • ImageSwitchHelper – a "fit-and-finish" control that helps avoid "jumping" when the image on the right changes. The control preserves the frame size until the next image is loaded.
  • An easy way to keep UI alive and preserve the dialog view (DialogStore.cs). If you open EasyPainter you'll notice that every time you click "Open from Flickr" you will go to your previous view instead of resetting the UI.
  • IUserInterface – a kind of generic interface for reusable UIs and for connecting UIs with other parts of your program. This interface is used in all dialogs in EasyPainter, for example to update the view when filter values change. It also allows to click through effects without clicking Cancel on each dialog (for example). All EasyPainter filter UI dialogs are built on-the-fly from metadata info assigned to the filter (this would come in another sample sometime).

I almost missed something important: once you have the image Url, you can display it in an Image tag. If you want to use it from within WriteableBitmap though, you'll have to round-trip it through the server that serves the .xap file (in EasyPainter's case that's www.nokola.com).

Also note that Source Pack 1 has a refresh today too containing new features and bug fixes!

I hope this sample will help you make more responsive/pleasing UIs in addition to Flickr!

Hope you like it! Please comment :)


nokola.com | Terms | Log in

Recent

About the author

Happy & enjoying life. Software enthusiast.
The opinions I express here and on nokola.com are mine and not my employeer's (Microsoft).
This is the official blog of nokola.com. You can find Silverlight samples, coding stuff, and hopefully other interesting things here.