Anti-aliased Lines And Optimizing Code for Windows Phone 7–First Look

Oct 14, 2010

Update Oct 27, 2010: Thanks to Shai Rubinshtein (see comments) for pointing out an issue with AALine(), source code updated below and in link.

Some (long) time ago I decided to port Fantasia Painter to Windows Phone 7. When I ran it on an actual device (my friend’s, no I don’t have it yet unfortunately) last week, updating the screen while painting had about 0.5 second lag. This lag is quite unacceptable for a painting app. Here’s how I fixed it.

Turns out, WriteableBitmap.Render() and Invalidate() incur some significant performance cost. I decided to replace the .Render(new Line()) with my own line-drawing function.

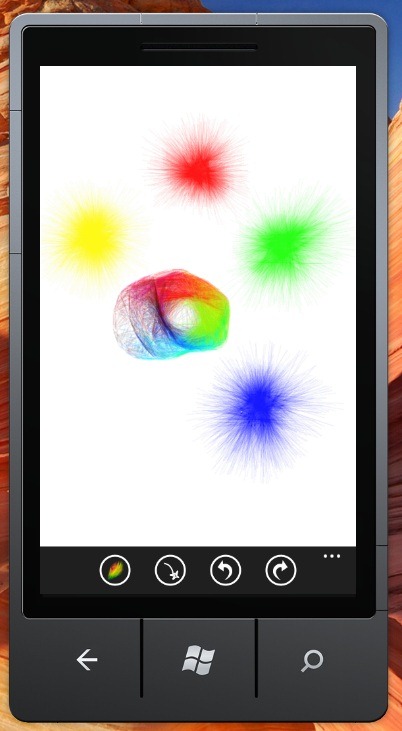
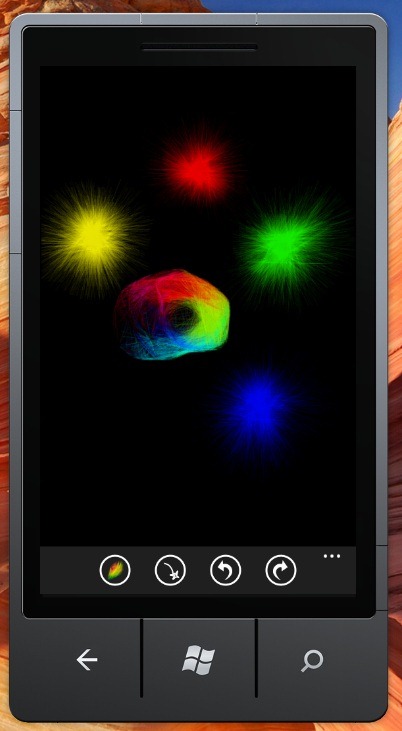
I ended up creating my own anti-aliased and alpha blending function, that has similar quality to Render(new Line()) and runs 4.8 times faster. Here’s a proof that it works Smile:

alphaSample1         alphaSample2

Contents of This Post

  • Line Drawing Algorithms
  • Optimizing for Windows Phone 7
  • The Actual Optimizations and Source Code

Line Drawing Algorithms

At first, I decided to use the basic aliased line that I had (now part of http://writeablebitmapex.codeplex.com/.) It turned out pretty ugly – the small spikes on the Furball brush became fat and aliased lines. At least it was running amazingly fast Smile

After a bit of research, I found out Wu’s and Gupta-Sproull’s anti-aliasing algorithms. Wu’s algorithm is fast, but the lines were too thin for my liking, the drawings didn’t look as “natural”.

You can look at a comparison pictures between the various algorithms here: http://igraphicsgroup.com/blog/2009/04/looking_at_different_types_of.html . On the comparison site: AGG (http://www.antigrain.com/demo/index.html) is an open source library that yields the best results in my opinion, but is slower and unfortunately licensed under GPL, which makes it unusable for me since I prefer to license my code under MS-PL which is OK for commercial use.

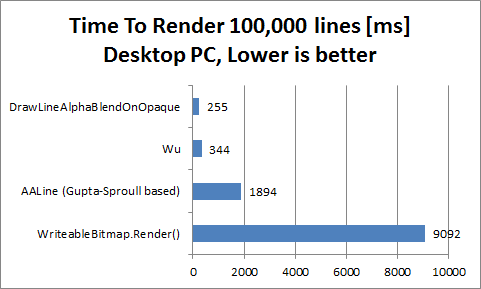
Here’s the speed comparison of the various algorithms, as tested on desktop PC. I have run only some of them on the device as well…will publish more results when I run all of them.

Note that I have not finished optimizing Wu’s line algorithm. Also, DrawLineAlphaBlendOnOpaque is just an aliased line with alpha blending.
image


I decided to optimize the Gupta-Sproull algorithm and see how that works. Here are some sites I looked at:

The algorithm I used is based on http://courses.engr.illinois.edu/ece390/archive/archive-f2000/mp/mp4/anti.html#algo, with some tweaks and fixes.

Optimizing for Windows Phone 7

If you go and look at the first wave of Windows 7 Phone phones here http://windowsphone7.com/ you’ll notice most all of them (at the time of this writing) feature Qualcomm Snapdragon chipset QSD8250 series. From this overview: http://www.pdadb.net/index.php?m=cpu&id=a8250&c=qualcomm_snapdragon_qsd8250, we can see that the processor is 32-bit with ARMv7 instruction set.

It’s a RISC processor with lots of registers. This tells us that we should try putting functions inline vs calling them – e.g. the AlphaBlendNormalOnPremultiplied() function below is a great candidate. We should also try to use int32’s mostly.

Here’s another overview of the Snapdragon chipset: http://www.arm.com/markets/mobile/qualcomm-snapdragon-chipset.php.

The Actual Optimizations and Source Code

You can pick up the current source containing all functions (not well documented since work in progress, except the header of AALine()) mentioned above here: http://nokola.com/sources/DrawingHelper.zip

Note on premultiplied values: I had to take special care when alpha blending with WriteableBitmap pixels, since those are alpha-premultiplied. When using the source, make sure you pass the correct values (premultiplied or not depending on function.).

List of optimizations to the Gupta-Sproull algorithm – code below:

  • Making sure that the distance is within the range 0..1, saving significant amount of multiplies in the alpha blending function AlphaBlendNormalOnPremultiplied()
  • Since the alpha changes often, I changed the alpha blend function to blend “normal” (non-premultiplied) values, instead of converting the values to pre-multiplied format before calling the function (this saves ~6 or so multiplications per pixel)
  • Changed distance to range 0..1023 and moved all floating point calculations outside the drawing loop. The distance computations in the loop are all fixed-point int arithmetic.
  • Multiplied alpha to the “inc” variables before the loop, so we don’t have to multiply it by the distance in the AlphaBlendNormalOnPremultiplied(). Effectively moving the alpha*distance before the loop and replacing the multiplication with additions in the loop.
  • Replacing all multiplications in the loop with additions, by having all distance increments be multiplied just before the loop
  • In the blend function: replacing the high-quality RGB blending with a little bit lower quality (no visible difference whatsoever – maybe pixels are off by one). Note that alpha blending is still using the high-quality computation (value * 0x8081) >> 23 is the same as value / 255. This is optimized to value >> 8 which is the same as value / 256 for RGB.
  • Updated blend function to use uint instead of int (tests on desktop showed 5% faster)
  • Replaced the (g >> 8) << 8 with g & 0xFFFFFF00 in the blending function.
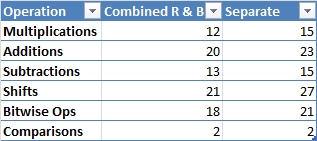
  • Combined the computation of R and B values into one when blending. This saves a lot of computations per pixel!:
    image

Disclaimer: I still have to test this on the phone to ensure I didn’t bug with the compiler optimizations, even though it seems it will yield much better results

Update Oct 18, 2010: Yeah it works great on actual device!

  • Last but not least: unrolling (copy-pasting 3 times) the AlphaBlendNormalOnPremultiplied function in the loop. This is not shown below for simplicity (it is implemented here: http://nokola.com/sources/DrawingHelper.zip). It improves speed by 20%

Potential future optimizations: getting rid of the floating point arithmetic completely (takes 0.2% CPU time now so probably not a big deal); improving speed of alpha blending further (lookup tables?)

/// <summary>
/// Draws an antialiased line, using an optimized version of Gupta-Sproull algorithm
/// </summary>
/// <param name="pixels">Pixels from a WriteableBitmap to draw to (premultiplied alpha format)</param>
/// <param name="pixelWidth">Width of the bitmap</param>
/// <param name="pixelHeight">Height of the bitmap</param>
/// <param name="x0">Start X</param>
/// <param name="y0">Start Y</param>
/// <param name="x1">End X</param>
/// <param name="y1">End Y</param>
/// <param name="sa">Opacity of the line (0..255)</param>
/// <param name="srb">Non-premultiplied red and blue component in the format 0x00rr00bb</param>
/// <param name="sg">Green component (0..255)</param>
public static void AALine(int[] pixels, int pixelWidth, int pixelHeight, int x0, int y0, int x1, int y1, int sa, uint srb, uint sg)
{

    if ((x0 == x1) && (y0 == y1)) return; // edge case causing invDFloat to overflow, found by Shai Rubinshtein

    if (x0 < 1) x0 = 1;
    if (x0 > pixelWidth - 2) x0 = pixelWidth - 2;
    if (y0 < 1) y0 = 1;
    if (y0 > pixelHeight - 2) y0 = pixelHeight - 2;

    if (x1 < 1) x1 = 1;
    if (x1 > pixelWidth - 2) x1 = pixelWidth - 2;
    if (y1 < 1) y1 = 1;
    if (y1 > pixelHeight - 2) y1 = pixelHeight - 2;

    int addr = y0 * pixelWidth + x0;
    int dx = x1 - x0;
    int dy = y1 - y0;

    int du;
    int dv;
    int u;
    int v;
    int uincr;
    int vincr;
   
    // By switching to (u,v), we combine all eight octants
    int adx = dx, ady = dy;
    if (dx < 0) adx = -dx;
    if (dy < 0) ady = -dy;

    if (adx > ady)
    {
        du = adx;
        dv = ady;
        u = x1;
        v = y1;
        uincr = 1;
        vincr = pixelWidth;
        if (dx < 0) uincr = -uincr;
        if (dy < 0) vincr = -vincr;

    }
    else
    {
        du = ady;
        dv = adx;
        u = y1;
        v = x1;
        uincr = pixelWidth;
        vincr = 1;
        if (dy < 0) uincr = -uincr;
        if (dx < 0) vincr = -vincr;
    }

    int uend = u + du;
    int d = (dv << 1) - du;        // Initial value as in Bresenham's
    int incrS = dv << 1;    // Δd for straight increments
    int incrD = (dv - du) << 1;    // Δd for diagonal increments

    double invDFloat = 1.0 / (4.0 * Math.Sqrt(du * du + dv * dv));   // Precomputed inverse denominator
    double invD2duFloat = 0.75 - 2.0 * (du * invDFloat);   // Precomputed constant

    const int PRECISION_SHIFT = 10; // result distance should be from 0 to 1 << PRECISION_SHIFT, mapping to a range of 0..1
    const int PRECISION_MULTIPLIER = 1 << PRECISION_SHIFT;
    int invD = (int)(invDFloat * PRECISION_MULTIPLIER);
    int invD2du = (int)(invD2duFloat * PRECISION_MULTIPLIER * sa);
    int ZeroDot75 = (int)(0.75 * PRECISION_MULTIPLIER * sa);

    int invDMulAlpha = invD * sa;
    int duMulInvD = du * invDMulAlpha; // used to help optimize twovdu * invD
    int dMulInvD = d * invDMulAlpha; // used to help optimize twovdu * invD
    //int twovdu = 0;    // Numerator of distance; starts at 0
    int twovduMulInvD = 0; // since twovdu == 0
    int incrSMulInvD = incrS * invDMulAlpha;
    int incrDMulInvD = incrD * invDMulAlpha;

    do
    {
        AlphaBlendNormalOnPremultiplied(pixels, addr, (ZeroDot75 - twovduMulInvD) >> PRECISION_SHIFT, srb, sg);
        AlphaBlendNormalOnPremultiplied(pixels, addr + vincr, (invD2du + twovduMulInvD) >> PRECISION_SHIFT, srb, sg);
        AlphaBlendNormalOnPremultiplied(pixels, addr - vincr, (invD2du - twovduMulInvD) >> PRECISION_SHIFT, srb, sg);

        if (d < 0)
        {
            // choose straight (u direction)
            twovduMulInvD = dMulInvD + duMulInvD;
            d += incrS;
            dMulInvD += incrSMulInvD;
        }
        else
        {
            // choose diagonal (u+v direction)
            twovduMulInvD = dMulInvD - duMulInvD;
            d += incrD;
            dMulInvD += incrDMulInvD;
            v++;
            addr += vincr;
        }
        u++;
        addr += uincr;
    } while (u < uend);
}

/// <summary>
/// Blends a specific source color on top of a destination premultiplied color
/// </summary>
/// <param name="pixels">Array containing destination color</param>
/// <param name="index">Index of destination pixel</param>
/// <param name="sa">Source alpha (0..255)</param>
/// <param name="srb">Source non-premultiplied red and blue component in the format 0x00rr00bb</param>
/// <param name="sg">Source green component (0..255)</param>
private static void AlphaBlendNormalOnPremultiplied(int[] pixels, int index, int sa, uint srb, uint sg)
{
    uint destPixel = (uint)pixels[index];
    uint da, dg, drb;

    da = (destPixel >> 24);
    dg = ((destPixel >> 8) & 0xff);
    drb = destPixel & 0x00FF00FF;

    // blend with high-quality alpha and lower quality but faster 1-off RGBs
    pixels[index] = (int)(
       ((sa + ((da * (255 - sa) * 0x8081) >> 23)) << 24) | // aplha
       (((sg - dg) * sa + (dg << 8)) & 0xFFFFFF00) | // green
       (((((srb - drb) * sa) >> 8) + drb) & 0x00FF00FF) // red and blue
    );

    //dr = ((destPixel >> 16) & 0xff);
    //db = ((destPixel) & 0xff);

    //uint srb = (uint)((sr << 16) | sb);

   
    //pixels[index] = (int)(
    //   ((sa + ((da * (255 - sa) * 0x8081) >> 23)) << 24) | // alpha
    //   (((((sr - dr) * sa) >> 8) + dr) << 16) | // red
    //   ( ((sg - dg) * sa + (dg << 8)) & 0xFFFFFF00 ) | // green
    //   ( (((sb - db) * sa) >> 8) + db ) ); // blue
}

Hope you like it! Please comment!


Fantasia Lite: New Silverlight Painting Tool

Jul 22, 2010

Edit: Fantasia Painter (full version), is now available here: http://fantasia.nokola.com

Edit 2: The Fantasia Lite version below, has been updated to include the new Rainbow brush (source code included too).

Here’s what I built tonight – a drawing tool that utilizes procedural brushes to enable almost everyone to create fluffy rabbits like this:

rabbit

Note that it took me about 2 minutes to “build the rabbit”. I’m sure someone else can do better. Supposedly, it lives in the hole on the right.

Here’s the live app:

As usual: Download source code

Note that this whole thing is inspired by http://mrdoob.com/120/Harmony (HTML5 – doesn’t work in IE8 as I write this) which was originally inspired by http://www.zefrank.com/scribbler/gallery/index_ran.html. By the way, make sure to check the funny videos “How To Dance Properly” on Ze’s page: http://www.zefrank.com/invite/swfs/index2.html

I talked way back (March or something) with Mr. Doob and he released his Harmony code under the MIT license. His latest source code is now released under GPL though. I didn’t look at it since I wanted my sources to be MS-PL license-able.

What Is A Procedural Brush?

A typical “brush” will just draw whatever it is supposed to draw (e.g. connect dots with lines). It just needs the current and previous mouse position.

A procedural brush is “smarter”, since it takes more variables into account.

Fantasia’s brushes make use of the following data to modify the drawing output:

  • mouse position
  • velocity (how fast the mouse moved)
  • time between 2 consecutive dots
  • distance between dots
  • slope (angle) of the line between the last and current dot
  • the last N previous dots (N varies between 2 and 100000)

The Fantasia brushes modify these outputs:

  • Color (e.g. color can be changed based on angle which can produce cool output – I haven’t published this brush yet)
  • Opacity (the faster you move, the less visible the trace is, such as in the OldPen sample
  • Stroke width (again can be controlled by speed, or maybe by slope (angle), which produces a nice caligraphy effect)
  • Drawing other random lines

Here is the source code of few of the brushes:

The Line Brush – same as a “regular” brush, just connects dots with straight lines:

public override void Stroke(double x, double y, double dx, double dy, double timeMsec, double distance)
{
    _surface.Render(new Line() { X1 = _prevX, Y1 = _prevY, X2 = x, Y2 = y, Stroke = _brush }, null);
}

The Old Pen brush, uses velocity = distance / time, to modify the color intensity:

public override void Stroke(double x, double y, double dx, double dy, double timeMsec, double distance)
{
    _surface.Render(new Line()
    {
        X1 = _prevX,
        Y1 = _prevY,
        X2 = x,
        Y2 = y,
        Stroke = new SolidColorBrush(
            new Color()
                {
                    A = (byte)(255 - distance / timeMsec * 100),
                    R = (byte) (_color.R * (distance / timeMsec * 100)),
                    G = (byte) (_color.G * (distance / timeMsec * 100)),
                    B = (byte) (_color.B * (distance / timeMsec * 100)),
                })
    }, null);
}

The History brush, most complex so far and used for the sketch and Furs:

public override void Stroke(double x, double y, double dx, double dy, double timeMsec, double distance)
{
    _points.Add(new Point(x, y));
    if ((Memory > 0) && (_points.Count > Memory)) _points.RemoveAt(0);

    _surface.Render(new Line() { X1 = _prevX, Y1 = _prevY, X2 = x, Y2 = y, Stroke = _solidBrush }, null);

    foreach (Point p in _points)
    {
        double cdx = p.X - x;
        double cdy = p.Y - y;

        double dist2 = cdx * cdx + cdy * cdy;

        if ((dist2 < _activationDistance2) && (_random.NextDouble() > (dist2 / (_activationDistance2 * ActivationChance))))
        {
            _surface.Render(new Line() { X1 = x + cdx * ReachSource, Y1 = y + cdy * ReachSource, X2 = p.X - cdx * ReachDest, Y2 = p.Y - cdy * ReachDest, Stroke = _stroke }, null);
        }
    }
}

The history brush can also do internal highlights if the _stroke is set to a LinearGradientBrush.

There is also a prototyping Test brush: I’m trying to “smoothen” the line as it is getting drawn. It’s using binaries by Charlez Petzold: http://www.charlespetzold.com/blog/2009/01/Canonical-Splines-in-WPF-and-Silverlight.html

Hope you like it! Please comment!


Simplex Noise (like Perlin Noise) in Pixel Shader 2.0 for Silverlight and WPF

Feb 11, 2010

Yay! 2D and 3D noise in pixel shaders!

After tackling the Hue shader I decided to move to something even more interesting, Simplex noise.

You've probably heard of Perlin Noise, if not see Rene's post with realtime 3D noise here and also check out my Living Noise sample and Living Noise blog post .

The "Noise" can be used to make effects such as fire, water, marbles, smooth motion, hand-drawn UI, space travel effects, nebulas and a lot more!

Simplex noise has similar characteristics to Perlin noise - it's continuous, smooth and its first derivative is smooth too. The nice thing about the Simplex, is that its much easier to compute and thus can be implemented in Pixel shaders.

Another advantage of the Simplex noise over Perlin noise is that the permutation bitmaps compress very well (8KB total), making the whole XAP about 30KB total, including the sample JPEG.  In comparison Perlin noise's bitmaps compress to about 350KB on my box.

Note you can also generate the maps almost instantly on the fly, eliminating the "size argument" when comparing Perlin and Simplex.

The source code download contains both 2D and 3D Pixel shader Simplex noise implementation. The 3D implementation still lacks some features - read on below.

Here is the live sample:

Download Source Code

The sample is based on this public powerpoint presentation by Natalya Tatarchu (AMD), who is the hero of today and I believe she made a lot of people happy with her great implementation of the Simplex noise! :)

I also re-visited Ken Perlin's homepage to remind myself of the noise a couple of times.

2D noise

This was (relatively) easy, since the reference implementation readily fits into PS 2.0 shaders, with lots of instructions available to experiement.

To overlay couple of noises on top of each other, I had to use the shader several times.

The biggest issue was generating the maps - I had to make sure to set the alpha to 255, otherwise weird things may happen (due to alpha premultiplication).

3D Noise

The 3d noise was more challenging - the implementation I have does not fit in PS 2.0 (84 instructions total, and PS 2.0 is 64 max).

I had to split the function in the middle, and make 2 shaders that build on top of each other. This means that the second shader works with the output from the first. There are several challenges:

1. There is color and shader information to be passed around, which means that either I have to pass the original image every time to the shader, or I have to compress the color space

I chose to compress the color space, and make it (R, S, G+B) where S is the shader value from the previous pass and RGB are the original image components. In the source code, I skipped the G+B part altogether ending with (R, S, 0) (monochrome source image), but you may change it to fix the issue.

If you do, please let me know, since I'm not planning to do it for now!

Note: in .NET 4.0 the 3D Noise shader fits into the PS 3.0 instruction limits. I left the original function in the source for people who want to use it with WPF.

Lot of writing! Hope you enjoy it!


Someone Said it Was Impossible: Hue Shift in Pixel Shader 2.0 (EasyPainter, Silverlight)

Feb 9, 2010

I read somewhere online that Hue changes can't be done in pixel shader 2.0, due to limitation of 64 instructions per slot.

Here's the sample that proves otherwise:

Download source code

Indeed the RGB-to-HSL-to-RGB conversion takes about 100 instructions in its typical implementation. PS 2.0 which is the shader model supported by Silverlight 3 only allows for 64 arithmetic instructions, as outlined in this comparison between pixel shaders on Wikipedia

How can we optimize it?

Optimizing pixel shader instruction slots is nice - in a typical C# world, you'd be adding if() statements to make your code run faster like this:

    if ( HSV.y != 0 )
       QUAD_REAL var_h = HSV.x * 6;
       QUAD_REAL var_i = floor(var_h);   // Or ... var_i = floor( var_h )
       QUAD_REAL var_1 = HSV.z * (1.0 - HSV.y);
       QUAD_REAL var_2 = HSV.z * (1.0 - HSV.y * (var_h-var_i));
       QUAD_REAL var_3 = HSV.z * (1.0 - HSV.y * (1-(var_h-var_i)));
       if      (var_i == 0) { RGB = QUAD_REAL3(HSV.z, var_3, var_1); }
       else if (var_i == 1) { RGB = QUAD_REAL3(var_2, HSV.z, var_1); }
       else if (var_i == 2) { RGB = QUAD_REAL3(var_1, HSV.z, var_3); }
       else if (var_i == 3) { RGB = QUAD_REAL3(var_1, var_2, HSV.z); }
       else if (var_i == 4) { RGB = QUAD_REAL3(var_3, var_1, HSV.z); }
       else                 { RGB = QUAD_REAL3(HSV.z, var_1, var_2); }
   }

Not with pixel shaders. If you look carefully at the bold if statement, removing it does not change the program logic. It just takes an extra instruction slot. In reality, I think the pixel shader code will run with the same speed with or without the if() (not 100% sure so correct me if needed).

With this knowledge, I decided to do these optimizations:

1. Instead of HSL-to-RGB, use HSV-to-RGB. The reference NVidia Shader Library implementation (source code here) of HSV-RGB-HSV takes ~70 or so slots.

2. Combine the min_channel() and max_channel() functions into 1 - saves a couple if() statements

3. Take out the if (x < 0) (x += 1) checks in the RGB-HSV function, and execute them once instead of twice, after the hue is modified.

4. Remove the "obsolete" if()-s like the one above

I was very happy to see that it just fit in the 64-instruction slot of PS 2.0! Note that it hits the limit and more complex Hue stuff may need further optimizations! :) If you do so, please let me know! Anyway hue tricks that don't use more slots are OK.

Here's the complete Shazzam-friendly source of the .fx file (also included in the sample project source above).

/// <summary>Hue shift</summary>
/// <minValue>0</minValue>
/// <maxValue>1</maxValue>
/// <defaultValue>0</defaultValue>
float HueShift : register(c0);
sampler2D Samp : register(S0);
#define QUAD_REAL float
#define QUAD_REAL3 float3
QUAD_REAL3 rgb_to_hsv_no_clip(QUAD_REAL3 RGB)
{
    QUAD_REAL3 HSV;
   
 float minChannel, maxChannel;
 if (RGB.x > RGB.y) {
  maxChannel = RGB.x;
  minChannel = RGB.y;
 }
 else {
  maxChannel = RGB.y;
  minChannel = RGB.x;
 }
 
 if (RGB.z > maxChannel) maxChannel = RGB.z;
 if (RGB.z < minChannel) minChannel = RGB.z;
   
    HSV.xy = 0;
    HSV.z = maxChannel;
    QUAD_REAL delta = maxChannel - minChannel;             //Delta RGB value
    if (delta != 0) {                    // If gray, leave H & S at zero
       HSV.y = delta / HSV.z;
       QUAD_REAL3 delRGB;
       delRGB = (HSV.zzz - RGB + 3*delta) / (6.0*delta);
       if      ( RGB.x == HSV.z ) HSV.x = delRGB.z - delRGB.y;
       else if ( RGB.y == HSV.z ) HSV.x = ( 1.0/3.0) + delRGB.x - delRGB.z;
       else if ( RGB.z == HSV.z ) HSV.x = ( 2.0/3.0) + delRGB.y - delRGB.x;
    }
    return (HSV);
}
QUAD_REAL3 hsv_to_rgb(QUAD_REAL3 HSV)
{
    QUAD_REAL3 RGB = HSV.z;
    //if ( HSV.y != 0 ) { // we don't really need this since it just adds an obsolete instruction slot
       QUAD_REAL var_h = HSV.x * 6;
       QUAD_REAL var_i = floor(var_h);   // Or ... var_i = floor( var_h )
       QUAD_REAL var_1 = HSV.z * (1.0 - HSV.y);
       QUAD_REAL var_2 = HSV.z * (1.0 - HSV.y * (var_h-var_i));
       QUAD_REAL var_3 = HSV.z * (1.0 - HSV.y * (1-(var_h-var_i)));
       if      (var_i == 0) { RGB = QUAD_REAL3(HSV.z, var_3, var_1); }
       else if (var_i == 1) { RGB = QUAD_REAL3(var_2, HSV.z, var_1); }
       else if (var_i == 2) { RGB = QUAD_REAL3(var_1, HSV.z, var_3); }
       else if (var_i == 3) { RGB = QUAD_REAL3(var_1, var_2, HSV.z); }
       else if (var_i == 4) { RGB = QUAD_REAL3(var_3, var_1, HSV.z); }
       else                 { RGB = QUAD_REAL3(HSV.z, var_1, var_2); }
   //}
   return (RGB);
}
float4 main(float2 uv : TEXCOORD) : COLOR
{
 float4 col = tex2D(Samp, uv);
 float3 hsv = rgb_to_hsv_no_clip(col.xyz);
    hsv.x+=HueShift;
    //if ( hsv.x < 0.0 ) { hsv.x += 1.0; }
    if ( hsv.x > 1.0 ) { hsv.x -= 1.0; }
    return float4(hsv_to_rgb(hsv),col.w);
}
 
btw, Visual Studio 2010 RC is out for MSDN subsribers (public tomorrow) and I'm going to publish all samples in VS 2010 from now on :)

Hope you like it!


EasyPainter Source Pack1: Color Picker, RangeSlider, Small Expander, Fast Drop Shadow and more!

Feb 8, 2010

I'm very happy to publish the EasyPainter source code pack. The controls in the pack are optimized for usability, speed and size.

All of them have been succesfully used in real-life apps which is the best way to test if something works.

Download Source Code

Here's a live demo:

This pack contains the following controls:

  • Color Picker - feature complete control that allows to pick any color, transparency or type in hex color
  • Editable, auto-formatting slider - if you want to give the user the ability to quickly choose values with previews, this control is for you. It will also try and self-adapt the number format (spaces after the zero), based on the scale you specify.
  • Fast drop shadow frame - consists of few rectangles, without customizations. But you can have a lot of those, in many sizes and not worry about performance.
  • Minimalistic Expander - the best thing about this control is that it's small (12KB). You don't need to get the whole 300+KB Microsoft.Windows.Controls from the Silverlight Toolkit.
  • The toolbar buttons used in EasyPainter on the side and top toolbar
  • The toolbar radio buttons used in EasyPainter for tool selection

Hope you like it!

btw, here's a nice trick that I used to do the rectangle background for the alpha picker:

         <Rectangle Fill="White" />
        <Line Stroke="Gray" StrokeThickness="4" StrokeDashArray="1,1" X1="2" Y1="0" X2="2" Y2="300"  />
        <Line Stroke="Gray" StrokeThickness="4" StrokeDashArray="0,1,0" X1="2" Y1="0" X2="2" Y2="300" Grid.Column="1"  />

In the posts coming up, I'll talk about compositing the image on screen, filters, and drawing with pixel shaders! There's also adorner, cursor code, and Flickr integration coming up!


EasyPainter Beta: Top Secret Online Image Editor Announced

Feb 4, 2010

Today I am announcing EasyPainter Beta: The Artist Within. An online image editor that is: Fast. Easy. Made for non-designers. And FREE! :)

Click here to open EasyPainter

Note: send feedback in the comments section of this post.

Unlike other online (or many offline) image editors, EasyPainter offers online effects comparable to powerful desktop apps, integrated search for millions of free-for-commercial or -personal use photos, and instant previews of any changes you make.

Find below:

  • Quick intro to easy painter
  • Many Screenshots
  • Getting Started Tutorials
  • Effect Tutorials
  • Tech Stuff

What Does Easy Painter Offer?

The Basics

  • Reveal the true-to-life colors in photos. Make them look like shot with professional camera. Your friends will be wowed!
    • The life-like photo filter combines several steps of popular GIMP/Photoshop "how to enhance an image" tutorials into one.  Save time with a 1-step effect instead of following an online tutorial.
  • Preview effects and changes instantly. It's OK to change your mind – many times per second. That's why we have computers for :)
  • Find millions of free for commercial use photos for your project from Flickr
    • Also filter by "government use", "non-commercial use", and other
  • Quickly resize, email size. Flip. Rotate. Draw to select objects and crop with a single click.
  • Manipulate huge 25 megapixel panoramas, fast. Powered by bleeding edge Silverlight and Pixel Shader engines.
  • Ease of use: tired of figuring out image programs with "Edge Detect", "Bumpiness factor" and "Directional Blur parameters"?
    • Work with more intuitive language like: "Hollow Outline", "Fast Motion", "Painting"
    • Mix-and-match. Draw on the image while an effect is open at the same time. Switch between effects and see your changes applied instantly

Effects

  • "Paint" with any effect, such as blur, emboss, bloom, saturation, and more
  • Make curves in trees, fluff clouds or perform complex photo manipulations easily by clicking and "drawing" effects with the mouse
    • Preview and change at will. For example, move a slider to bend a straight tree back and forth
  • Make changes that look good every time. Even if you are not a designer. All EasyPainter filters suggest the best values for your image.
  • Compare before and after with a single click on the currently open effect

Screenshots

All images combined are made in less than 25 minutes

The screenshots below are intended to show samples of the functionality. For more tutorials, see the Getting Started and Effects Tutorials sections

Open From Flickr:

.OpenFromFlickr

Painting With Effect:

PaintWithEmboss

Original:

This is the original image being modified in the next screenshots:More...


The Most Important Silverlight WriteableBitmap Gotcha - Does It Lose/Change Colors?

Jan 27, 2010

Edit Nov 21, 2011: changed 256/a to 255/a due to Gert’s comment – thanks Gert!

The first time I tried saving WriteableBitmap to png, the transparencies didn't look right. The color was "washed out" and replaced with gray:


Moreover: Let's say you wanted to set a half-opaque red pixel color inside a WriteableBitmap.

To my biggest surprise this didn't work:

bitmap.Pixels[i] = (255 << 24) + (255 << 16)

I got a redder pixel than expected! What's going on?

After long search and speaking with people, it turned out it's because WriteableBitmap for Silverlight uses pARGB (pre-multiplied alpha) format.

If you look at MSDN carefully, you'll notice the single place (as far as I know) that mentions it: http://msdn.microsoft.com/en-us/library/system.windows.media.imaging.writeablebitmap(VS.95).aspx

It reads: "When assigning colors to pixels in your bitmap, use pre-multiplied colors."

The reason for this initially unintuitive choice of format is speed. Blending with pre-multiplied colors can save significant time as compared to just ARGB.

For more info and blending formulas, read here: http://www.teamten.com/lawrence/graphics/premultiplication/

Here is the source code to call before saving WriteableBitmap to PNG in order to convert the colors to "regular" ARGB:

public static void CompensateForRender(int[] bitmapPixels)
{
    int count = bitmapPixels.Length;

    for (int i = 0; i < count; i++)
    {
        uint pixel = unchecked((uint)bitmapPixels[i]);
        // decompose
        double a = (pixel >> 24) & 255;
        if ((a == 255) || (a == 0)) continue;

        double r = (pixel >> 16) & 255;
        double g = (pixel >> 8) & 255;
        double b = (pixel) & 255;

        double factor = 255 / a;
        uint newR = (uint)Math.Round(r * factor);
        uint newG = (uint)Math.Round(g * factor);
        uint newB = (uint)Math.Round(b * factor);
        // compose
        bitmapPixels[i] = unchecked((int)((pixel & 0xFF000000) | (newR << 16) | (newG << 8) | newB));
    }
}

If you look at the previous post, you'd call CompensateForRender(_screen.Pixels) just before TgaWriter.Write(_screen, fileStream);

Obviously the above function can be optimized, and should if you use it often (e.g. several times per second or as part of batch processing).


You know that speed is a benefit, the drawback is that there is some loss of precision. It's nice that for completely opaque images there is no precision loss and the pARGB format is equivalent to the ARGB format. So in most cases you wouldn't care :)

In the cases where the alpha gets below 255, you have to go all the way to 128 alpha to lose one bit-per-pixel from the color information. Not that bad, given how many CPU cycles can be saved in blending and used for something else.

Hope this helps, please comment - if you had a choice, which format would you choose and why?


Quick and Dirty Output of WriteableBitmap as TGA Image

Jan 21, 2010

If you ever needed to save a WriteableBitmap to an image file without too much hassle (e.g. for debugging purposes), you could use this simple source code to save it as TGA and then open with Paint.NET:

From Wikipedia: "TGA files are in widespread use due to their simplicity and ease of implementation and lack of encumbering patents."

public static class TgaWriter {
    public static void Write(WriteableBitmap bitmap, Stream output) {
        int width = bitmap.PixelWidth;
        int height = bitmap.PixelHeight;
        int[] pixels = bitmap.Pixels;
        byte[] pixelsArr = new byte[pixels.Length * 4];

        int offsetSource = 0;
        int width4 = width * 4;
        int width8 = width * 8;
        int offsetDest = (height - 1) * width4;
        for (int y = 0; y < height; y++) {
            for (int x = 0; x < width; x++) {
                int value = pixels[offsetSource];
                pixelsArr[offsetDest] = (byte)(value & 255); // b
                pixelsArr[offsetDest + 1] = (byte)((value >> 8) & 255); // g
                pixelsArr[offsetDest + 2] = (byte)((value >> 16) & 255); // r
                pixelsArr[offsetDest + 3] = (byte)(value >> 24); // a

                offsetSource++;
                offsetDest += 4;
            }
            offsetDest -= width8;
        }

        byte[] header = new byte[] {
            0, // ID length
            0, // no color map
            2, // uncompressed, true color
            0, 0, 0, 0,
            0,
            0, 0, 0, 0, // x and y origin
            (byte)(width & 0x00FF),
            (byte)((width & 0xFF00) >> 8),
            (byte)(height & 0x00FF),
            (byte)((height & 0xFF00) >> 8),
            32, // 32 bit bitmap
            0 };

        using (BinaryWriter writer = new BinaryWriter(output)) {
            writer.Write(header);
            writer.Write(pixelsArr);
        }
    }
}

 Here's a sample usage of the above class:

Important Edit: if you want to support transparency, you'd have to call CompensateForRender() from this post: http://nokola.com/blog/post/2010/01/27/The-Most-Important-Silverlight-WriteableBitmap-Gotcha-Does-It-LoseChange-Colors.aspx

private void btnSave_Click(object sender, RoutedEventArgs e) {
    WriteableBitmap _screen;
    // ... do something with the WriteableBitmap here...

    SaveFileDialog dialog = new SaveFileDialog();
    dialog.DefaultExt = ".tga";
    dialog.Filter = "TGA Image (*.tga)|*.tga";
    dialog.FilterIndex = 1;

    if (dialog.ShowDialog() != true) return;
    using (Stream fileStream = dialog.OpenFile()) {
        TgaWriter.Write(_screen, fileStream);
        fileStream.Close();
    }
}

The benefit of the above code is that you don't have to worry about image libraries, external binary dependencies and such - just paste & go :)

The TGA file format: http://en.wikipedia.org/wiki/Truevision_TGA


Calculating Shader Effects in WriteableBitmap (Fast Float Computations And More)

Jan 11, 2010

Here's a small code snippet that allows you to calculate any pixel shader and get the output into a WriteableBitmap!

Stream stream = Application.GetResourceStream(new Uri("SilverlightApplication1;component/Images/test.jpg", UriKind.Relative)).Stream;
WriteableBitmap result = new WriteableBitmap(1, 1); // avoid creating intermediate BitmapImage
result.SetSource(stream);

Image image = new Image();
image.Effect = new BlurEffect(); // any pixel shader effect
image.Source = result; // set the image to the original
result.Render(image, null);
result.Invalidate(); // render the pixel shader
image.Source = null; // release the bitmap reference
image.Effect = null;
GC.Collect(); // remove all obsolete bitmaps from memory [optional]
// result contains the image with shader effect applied! assign it to any Image.Source!
myImage.Source = result;

For the sample, I used InvertColorEffect() that I had on my PC, but you could try with your own (or just use the BlurEffect() to see how it works).

Note that the image doesn't even have to be part of the UI tree, and you don't have to wait for a render pass!

Why is this good?

In an apples-to-apples comparison (float computations) pixel shaders are much faster than managed code. See http://kodierer.blogspot.com/2009/08/silverlight-3-writeablebitmap.html for performance comparison. This means that you can now run even faster computations from managed code in Silverlight!

Also in case Silverlight eventually executes shaders on the GPU (I don't know what is the plan about that), your applications will really be able to benefit from the fast computations!

There is also one other reason why is it so good: but I'll mention it in a later post (working on secret project now...) :)


Game Cutscenes Part 1 - The Sequencer (No Code Yet, Just Concept)

Jan 4, 2010

This post is a call for initial feedback, before I go deeper into coding and stuff, just to make sure I'm not missing anything and capture cool ideas...

I've been working on a new game recently, and thought it would be really nice to have some cutscenes in the game.

Here's a sample frame such a scene: 

Obviously, the above frame is not too advanced, but it looks pretty exciting and fun to create, especially when combined with the right soundtrack

Credits:

   Image background: http://shadow-trance.deviantart.com/art/Moonshine-Bay-88935567

   Ninja warriors: http://tinrobo.deviantart.com/art/Little-Samurai-Warriors-80135868 

   Both image sources are by-nc-sa CC license: http://creativecommons.org/licenses/by-nc-sa/3.0/

The Sequencer

What we really need is a way to control all game "events" (such as encounters, text on screen, music, etc). The Sequencer is a central point (e.g. a C# class), that "knows" about high-level game events, such as "Level1 Start", or "Battle 2 Encounter".

The sequencer controls all in-game events, such as text being displayed, cutscenes, music sync (for example, when a cutscene starts, the sequencer will switch the music).

Here's a small high-level diagram of what I think is needed to implement a single-screen cutscene:


I'm assuming that Sequencer, Sequence and the Action-s will end up as C# classes that know how to operate on the game world.

In the above diagram, Sequence1 might represent the complete cut-scene, with all dialogue that occurs.

Interface


Above is a draft interface (made with Paint, if it's not obvious :))  for creating the cutscenes.

The initial version of the interface will allow for:

  • Choosing music (1 only)
  • Selecting background
  • Adding characters, dialogue, movements, synced to the music
  • Save as XML

That's all for now.

Any ideas that you'd like to share or other feedback? Please comment.


nokola.com | Terms | Log in

Recent

About the author

Happy & enjoying life. Software enthusiast.
The opinions I express here and on nokola.com are mine and not my employeer's (Microsoft).
This is the official blog of nokola.com. You can find Silverlight samples, coding stuff, and hopefully other interesting things here.